
[EN] Eventforms
Create and use event forms correctly
The event form handles all registration management for events: participants, cancellations, limited visitor numbers, companion, waiting lists, as well as integration into email campaigns and on the website. You also have the option to customise the registration form to suit your needs and collect exactly the information you require from participants.
In this whitepaper, you will learn how to properly create and use an event form for your event.
How do I create an event form in eworx Marketing Suite?
There are two ways how you can create a new event form.
Under „events“ > „Event forms“ you have the possibility to create a new event form by clicking on the button „+ Create new event form“. Another option is available at the event dashboard of an existing event.
In both variants, you have the option to copy an existing form or create a new event form. After saving, additional tabs and selections will appear, allowing you to further edit the form.
All event forms can be found under „events“ > „Event forms“. There you also have the possibility to edit your existing event forms.

What settings can be set in the individual tabs of the event form?
What customizations are possible in the settings?
When you create a new form, you must specify an internal name. You can also enter internal notes in the “Description” field. Additionally, you have the option to lock the form as of a specific date and time. From that deactivation date and time onward, the text you specify in the designated text field will appear when the form is accessed. For event forms, you also have the option to lock only the registration section and not the entire form. Additionally, you can specify whether you want to prevent subcribers from making subsequent changes to their data and whether English system messages should also be displayed.
It is also possible to configure forms so that they can only be used by subscribers in a specific subscriber group. This ensures that only authorized subscribers can register via the form.
If a subscriber does not belong to the specified target group, the message stored in the form will be displayed.
- Form linked in an email campaign: The message appears immediately when the form link is clicked.
- Form embedded on a website: Authorization is verified only after the form is submitted. If the subscriber is not authorized, the predefined message is then displayed.

What adjustments are possible in the „Registration“ tab?
In the „Registration“ tab, you can define the maximum number of participants allowed should your space allotment be limited. Likewise, you can set here whether a waiting list should be used and whether companions are admitted.
How can I integrate a waiting list?
With event forms, you have the option of deciding whether participants for whom there is currently no space available receive a cancellation or are placed on the waiting list.
When using the waiting list, you can automate the process with event-based campaigns and easily keep your prospects informed about their current status. Subscribers will be notified when they are added to the waiting list or when the guest is manually added to the registrations or cancellations via the guest list.
If you do not want a waiting list, you can specify a text that will be displayed instead of the registration form when the event is fully booked.

What do I have to set if my guest wants to bring a companion?
When registering, you can decide whether you want to allow companion and how many companion a person may bring. The maximum number of companions can be defined with a fixed value or by a subscriber field. The subscriber field must be of type „Number“ for this. Only when used in an e-mail campaign, the maximum number of companions is set to the value of the subscriber field.
You can also define a label for a form field in order to be able to query the desired information of the companions (e.g. name of the companion).

How can I integrate the „Companion“ field in the form?
After you have set in the „Registration“ tab of the event form that a companion should be allowed, you have the option in the „Content“ tab of the form to add the field for the query of the companion. To do this, switch to the „Extras“ tab (star) to insert the „Companion“ field. The label of the form field can be set in the „Registration“ tab.

The visibility of the companion field can also be controlled depending on other fields. For example, a yes/no field to ask whether a companion will be brought to the event.
If “Yes” is selected here, the desired fields for entering the companion's data can then be displayed. If “No” is selected, these fields remain hidden.

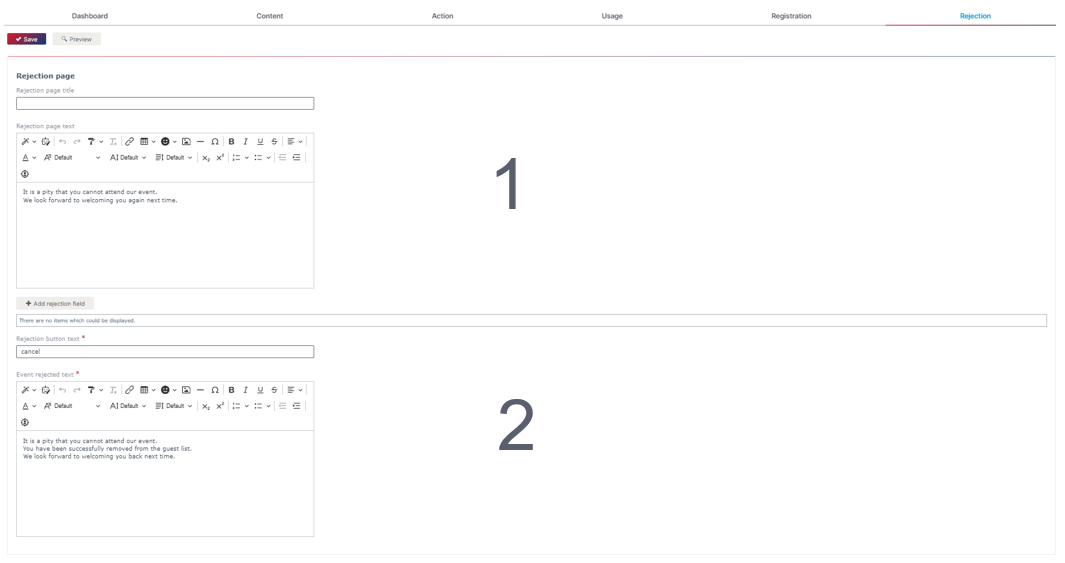
What adjustments are possible in the "rejection" tab?
Especially when the number of places for your event is limited, it makes sense to give registered attendees the option to cancel their registration for the event if they are unable to attend after all. This frees up places for guests on the waiting list.
- In the first section, you can define the title and the text of the Rejection page that is displayed when a cancellation button is included in a campaign. This information is optional, as you do not necessarily have to use this type of link.
Using the cancellation field, you can request additional information—for example, the reason for cancellation or whether the event materials should still be sent.
You can find out how to add the cancellation link to your campaign in the following Whitepaper. - The second text field is mandatory. Here you define the confirmation text displayed after an event cancellation. This text is required. If a subscriber is already registered for the event and clicks the registration link again, they will be informed that they are already registered and will be given the option to cancel their registration for the event. The cancellation must also be confirmed again using the cancellation button to protect event cancellations from being triggered automatically by bot clicks.
Tip: In the preview, you can check how the “Rejection page text” will appear to your subscribers.
What customizations are possible in the „Content“ tab?
In the „Content“ tab, in addition to the „Subscriber fields“, you have independent „Form fields“ available, which are not saved with the subscriber data, but are only saved with the form for a better overview and can be exported.
Use „Subscriber fields“ for data that is already stored with your subscribers (e.g. ‚Last name‘ and ‚E-mail‘) or that you want to collect for further use (e.g. ‚Company‘).
For information that you only want to collect for the event (e.g. selection of lectures, menu selection etc.), create a „form field„.
A detailed description of how to customize the form can be found here.

What customizations are possible in the „Action“ tab?
In the „Action“ tab, under „Campaign when submitting form„, you can select the event-dependent email or SMS campaign that you want to send as confirmation of the registration. Here it is also possible to select a campaign from the „Newsletter archive„. For event forms, it is also possible to add the event form to a desired event.
Also you can set who should receive a „notification mail“ when new registrations arrive. If the contingent is full and you have activated the waiting list function (see below), the notification will contain the hint to the waiting list.

What customizations are possible in the „Use“ tab?
You can link the form in a newsletter and also embed it in a website. In the „Use“ tab, you will find various options on how to include the form on the website.
What do I have to consider when matching subscribers?
In the „Data matching“ (found in the „Use“ tab – at the bottom of the page), the „Update existing subscriber“ option must be used for events so that a subscriber's data is not overwritten if someone other than the original newsletter subscrber signs up for the event in a newsletter via the event form.

How can I test a form?
The easiest way is to call the form via the form or event dashboard. If a form has already been stored for your event, you will find an icon at the top right of the corresponding tile in the event dashboard to call up the event form. Clicking on this icon opens a window in the browser, which you can use to fill out the form, submit it and thus test the event registration.

You can also test the form by switching to the „Use“ tab in the form. To do this, copy the „url to the form“ and paste it into a new browser tab.

Note: You cannot test the form in a test campaign, otherwise the „Preview subscriber“ will be overwritten here.
How can I change the status of the event form and what influence does it have?
Edit the desired event form to change the status of the form. Then, in each tab at the top, next to the „Save“ and „Cancel“ buttons, you have the option to change the status between ‚Online‘ and ‚Archived‘.
Whether the status of the event form is set to ‚Online‘ or ‚Archived‘ has no effect on its use in the event. The status only affects the grouping in the list view.

What information do I get in the dashboard?
As in every tab, the form name and status are displayed at the top of the page.
On the dashboard of the event form you will find the form info where you can see if the form is locked and from when the form is locked. You can also see which user created the form, when the form was created and which language is stored. These settings can be edited at any time.
A preview of your form can also be found on the dashboard, which you can also open in a separate window. You can select the desktop or mobile format for the display directly on the dashboard as well as in your own preview window.
You can also see at a glance on the dashboard which actions have been defined for the form. You can choose between actions for subscribers and actions for users. You can also see whether a success and error page has been configured.
Another tile on the dashboard shows whether the form is used in the newsletter and/or on the website. You can also see here which settings have been stored for data synchronization.
The „Statistics“ tile offers another interesting insight. Here you can see the form calls and cancellations. If the form was integrated on the website, you can see at a glance whether existing subscribers and/or new subscribers have registered.

Updated 9 days ago