[EN] Media database
The storage location for your files in the eworx Marketing Suite
The media database is a database in the eworx Marketing Suite that contains all files (images, documents, etc.) uploaded to the eworx Marketing Suite (e.g. in campaigns, forms, etc.).
In the following white paper, we summarise all the functions of the media database for you.
Where can I find the media database?
The most recently uploaded files can be accessed via the eworx Marketing Suite dashboard. The media database can be accessed via the page navigation (last item) or via the dashboard.
How can I upload files to the media database?
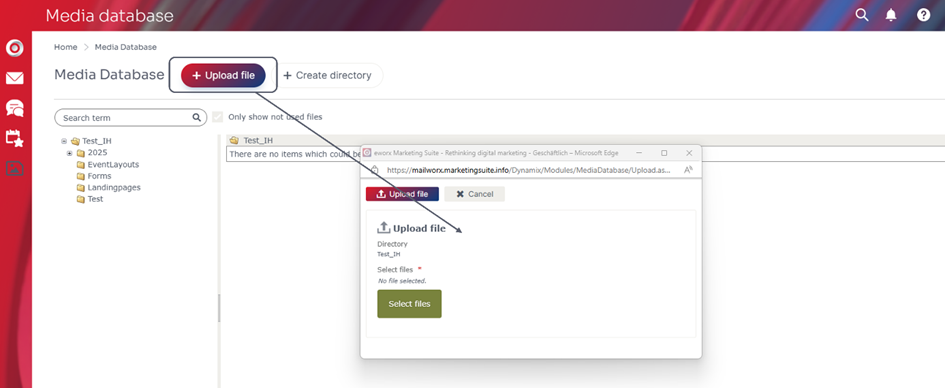
There are two ways to upload files to the media database. Firstly, files can be uploaded directly to the media database. To do this, click on the “+ Upload file” button to upload the desired file. Several files can be uploaded at the same time. The files are placed in the folder you are in when uploading the files.
Another option is to upload files directly in a campaign or form.
When images are inserted into campaigns or forms, they are stored in the media database.
It is also possible to link to a file in the media database within a campaign. A file can be uploaded directly in the campaign and stored in the media database, or an existing file can be selected from the media database. In the following whitepaper, you can read about how to link to files in the media database in your campaign.
When files or images are uploaded in a campaign, a folder is automatically created in the media database and named after the campaign. This folder is located in a parent folder. A parent folder is created for each year.
There is also a separate folder for the forms. This folder contains the images that are uploaded in the forms.
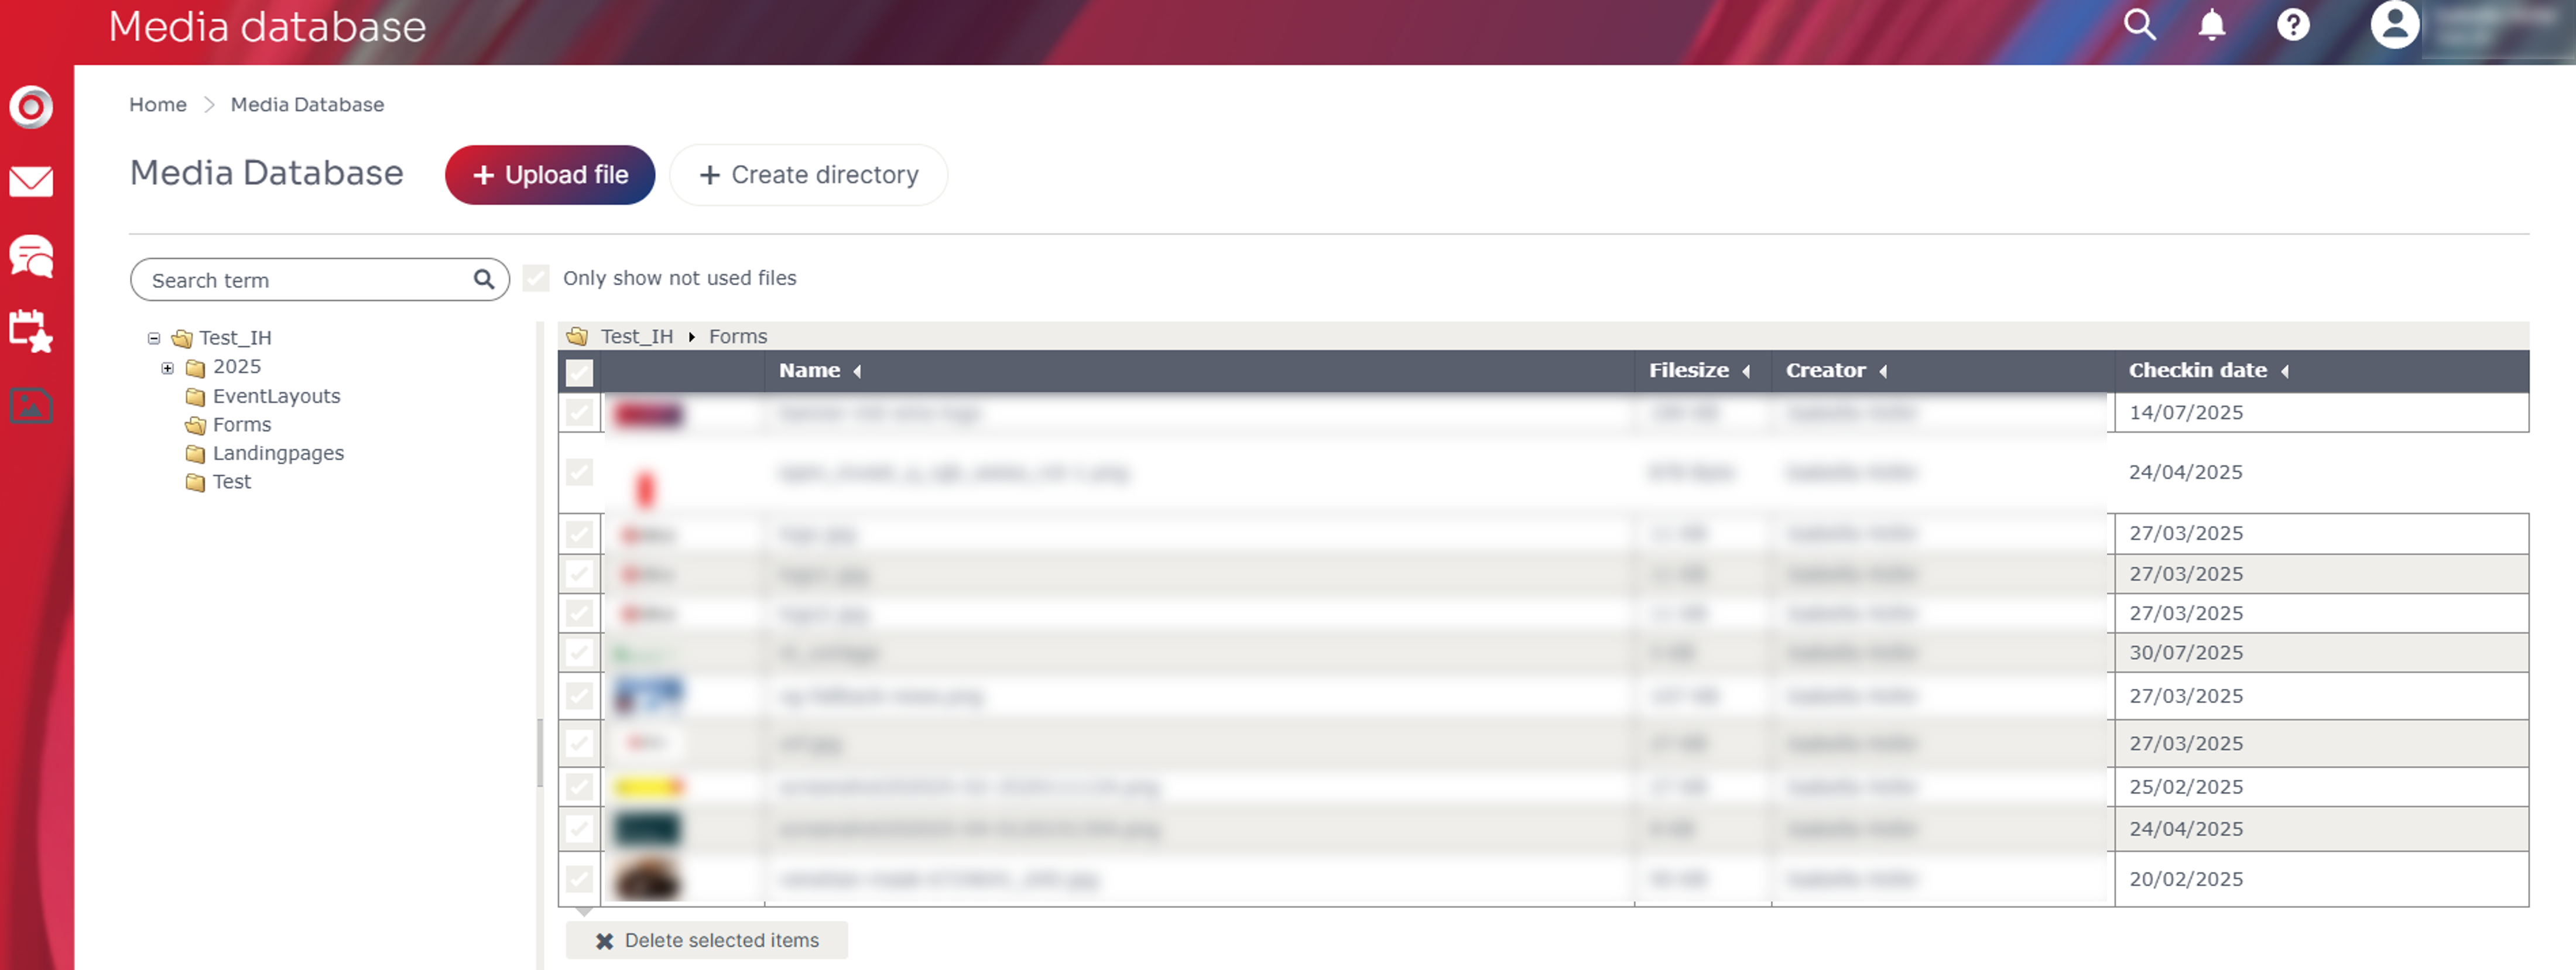
In addition to file names and sizes, the overview also displays the creator and check-in date of the files. This allows you to sort files within a folder by creator or check-in date.

The following file and image formats can be uploaded to the media database:
Permitted file formats:
zip | bmp | jpg | jpeg | gif | png | doc | docx | xlsx | pdf | xls | ppt | txt | arj | mp3 | wav | ogg | flac | tiff | tif | mp4 | avi | wmv | qt | mov | mpg | mpeg | mpe | flv
Permitted image formats:
jpg | jpeg | gif | ico | png | tiff | tif
Duplicate check
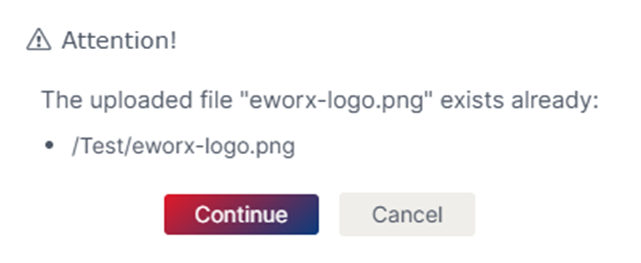
When uploading files to the media database, the file name is checked to see if the file already exists in the media database. If a file is uploaded that has the same file name as an existing file, a warning appears. You can then decide whether you want to continue or cancel the download.
Uploading large images
When uploading images larger than 1 MB, a warning will appear. If images larger than 5 MB are uploaded, an error message will appear and the download will not be possible.
In order to use as little web space as possible, we generally recommend uploading images in the size in which they are needed.
How can I edit files in the media database?
Right-click on the desired file to view the file properties, delete the file, open the preview, download the file and view the references.
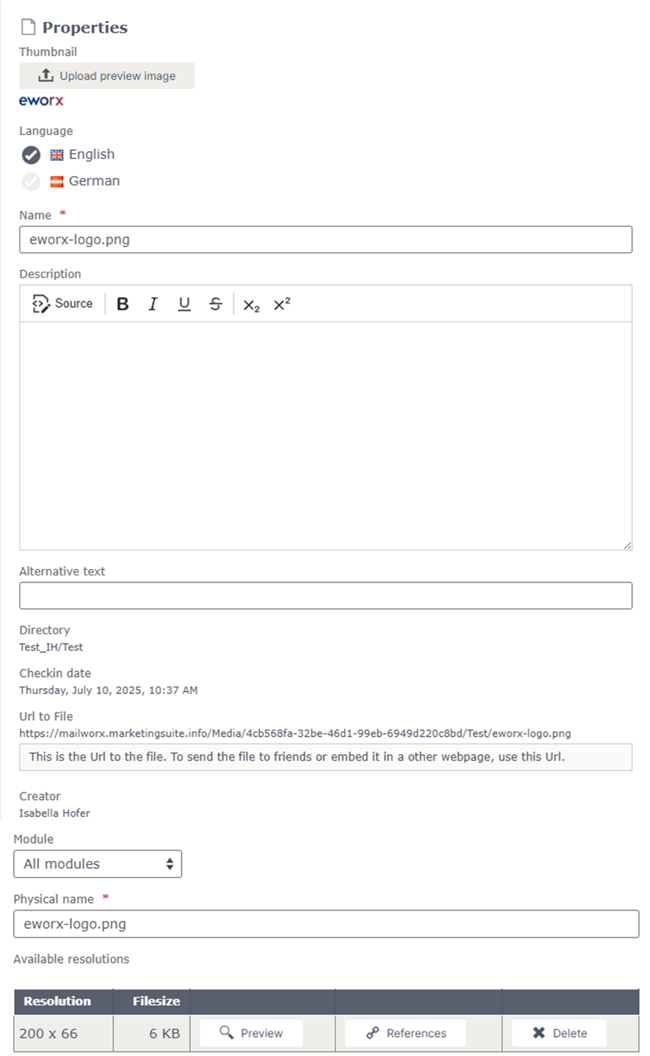
What settings can I find in the properties?
In the properties of a file, you have the option of uploading a preview image. This is less useful for images, as the image itself is generated as a preview image. However, this function is more useful for other files such as PDFs, Word files, etc. The language can also be stored in the properties (provided that multiple languages are activated for your client). You also have the option of changing the file name and adding a description here.
The properties also provide an overview of the folder in which the file is located, when it was uploaded to the media database (check-in date) and the URL for the file, which you can use to embed the file in a website or send it to people outside the eworx Marketing Suite.
When you upload a new image to a campaign, the image is uploaded to the “media database” in its original size. The image is converted to the size of the corresponding image field. Another image version is also created in the “new” resolution and stored in the “media database”. These available resolutions can also be found in the properties.
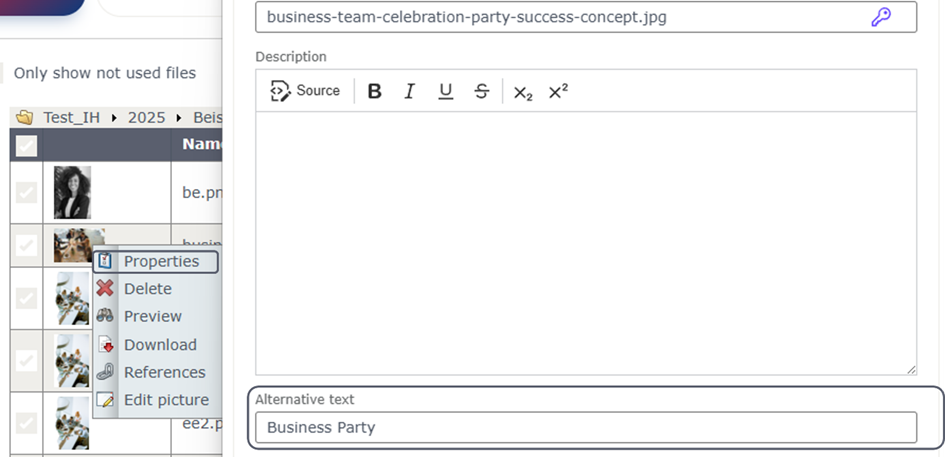
Where can I find the alt text and can I edit it?
An alternative text (alt text) is a textual description of an image that contributes to accessibility.
When uploading an image, the file name is always used as the alternative text. In the “Image settings” you now have the option of entering an “alternative text”.
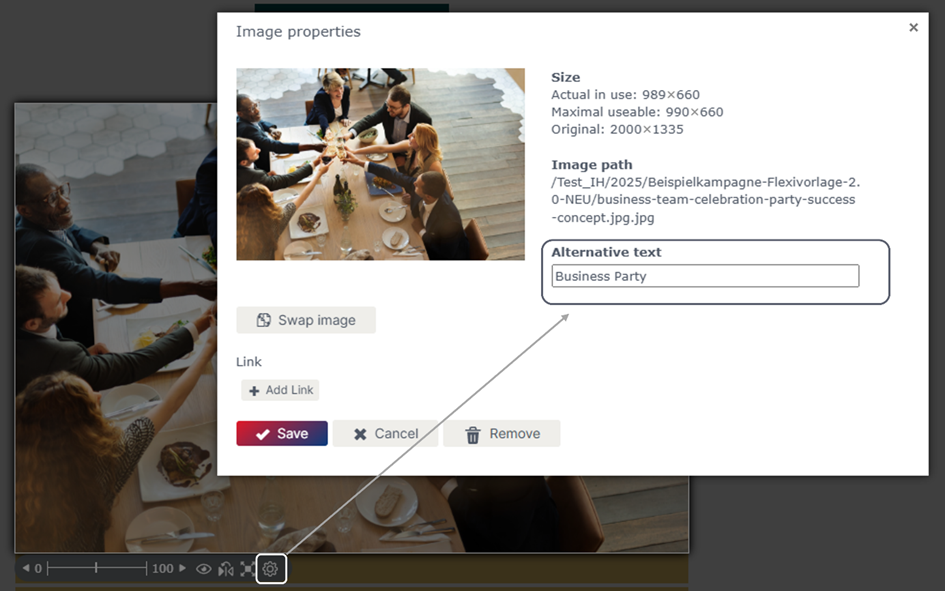
Alternatively, the alt text can also be adjusted retrospectively in the “Media database” under the “Properties” (accessible by right-clicking) of the image.
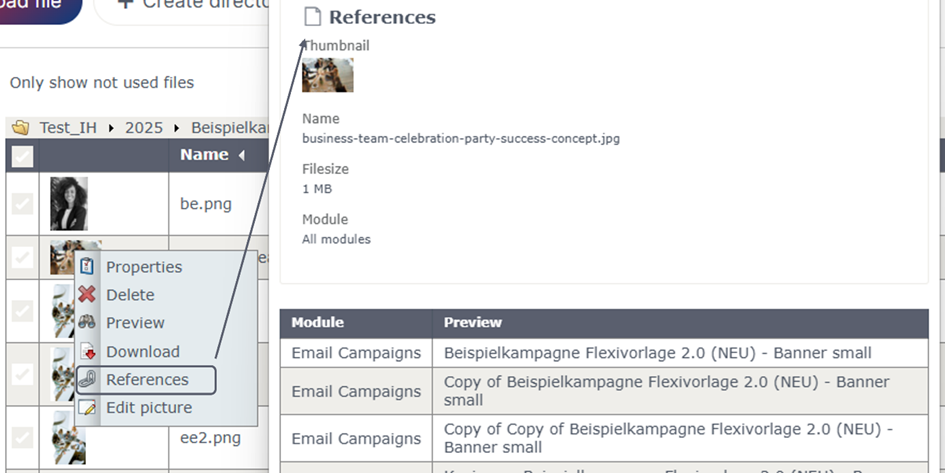
What are references used for?
Under References, you can check whether a file is being used and where exactly it is being used. You can see in which module (e.g. email campaign) and in which section (e.g. conclusion of an email campaign) the file is located. Each individual reference can also be edited. By clicking on the “Edit” button, you will be taken directly to the respective module in which the file is located.
What are the consequences of deleting files in the media database?
Right-click on the desired file to delete it. You will be asked again if you really want to delete this file. Please note that when you delete a file, the corresponding resolutions and image versions are also deleted. If a file is deleted that is part of a campaign, for example, it can no longer be displayed or accessed. This is also the case if the campaign has already been sent and is in the subscribers inbox. Therefore, only files that are no longer needed should be deleted.
However, deleting files in the media database also has the advantage of freeing up web space. In principle, files that are older than one year can be deleted without hesitation if they are no longer needed. It is unlikely that your subscribers will read a newsletter that is older than one year.
How can I create and edit folders in the media database?
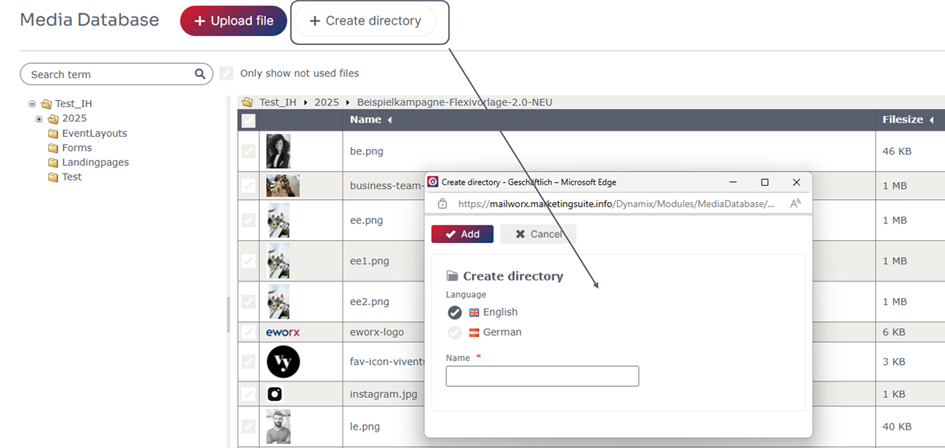
Next to the “+ Upload file” button is the “+ Create folder” button. Depending on which folder you are in, the folder will be created when you click on this button. All you have to do is specify the name and, if necessary, the language.
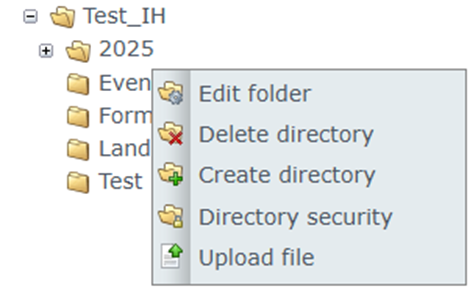
Right-clicking on a desired folder allows you to edit the folder (e.g. language, name, physical or internal name), delete it, create another folder, configure folder security or upload a file to the desired folder.
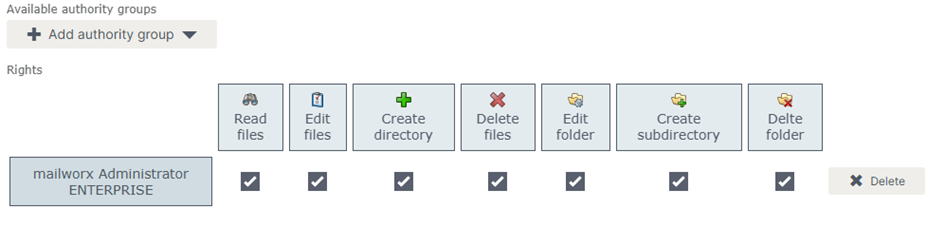
In folder security, you can set restrictions for permission groups. You can specify whether a permission group is allowed to read files and edit, create and delete files and folders.
If a folder is deleted, the files it contains are also deleted.
Updated 8 months ago