[EN] CRM Installation & Configuration
(CRM 2013-2016, Dynamics 365)
CRM Online Connector 2013-2016 and Dynamics 365
This installation & configuration guide will help you easily connect your professional email marketing and your Microsoft Dynamics CRM (2013-2016, Dynamics 365) system step by step.
What do I need to consider before installation?
In order to integrate the CRM Online Connector into your Microsoft Dynamics CRM system, you first need the necessary approval in the eworx Marketing Suite and an activation key.
If the approval in the eworx Marketing Suite has not yet been granted and you have not yet received the activation key, simply contact us.
Once your approval in the eworx Marketing Suite has been set up and you have received your personal access key, you're ready to go! Please follow all steps of the installation exactly as instructed in order to be able to use the full functionality of the CRM Online Connector without any problems right from the start.
What steps are necessary for installation?
To begin setup, you must have administrator rights in your CRM system.
Download the managed solution (Zip file) from the mailing you have already received.
Integrate the managed solution into the CRM system in the advanced settings under “Settings” > “Solutions” > “Import”. If you have downloaded an on-premise solution from the mailing, please use a user who is a deployment administrator to import it.
Now select the downloaded zip file and click on “Continue”:
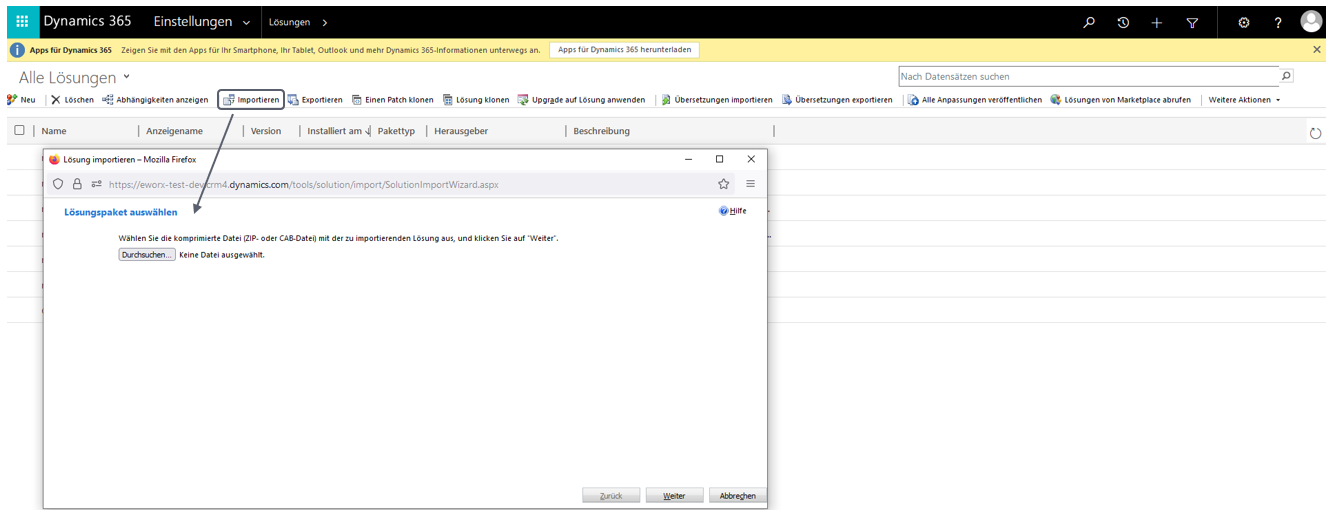
In the next step, continue the import process by clicking "Next".

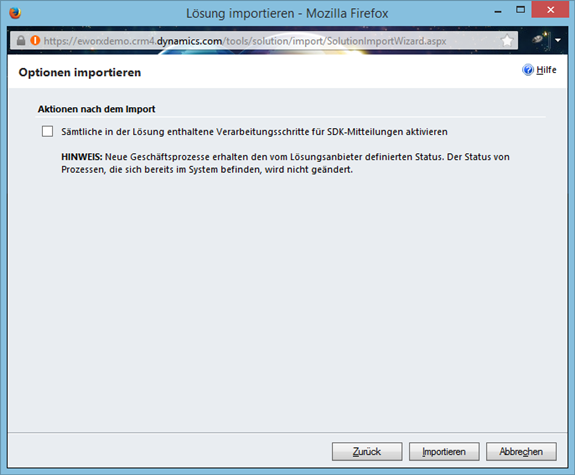
Important: Now deactivate the option “Actions after import”, as the corresponding SDK messages can only be activated after the configuration has been completed. Then click on “Next” again (the import process may take a few minutes):
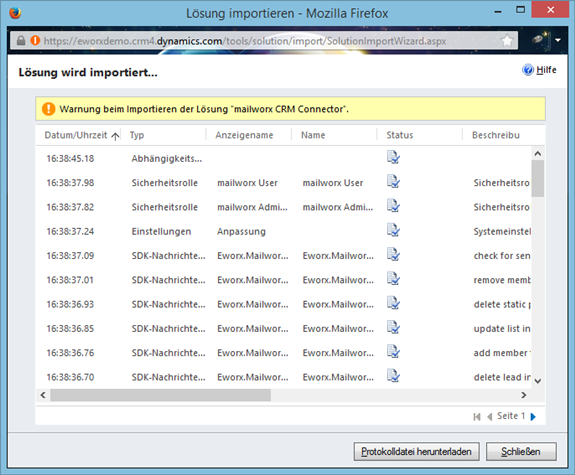
You will then receive a summary of the import process. The CRM Online Connector is available in German and English – if you receive a message requesting translations, it means that one of these two languages is not supported on your CRM system. Ignore this message and click on „Close“:
After the successful import, the new entry “mailworxCRMConnector” will now be displayed in the overview of solutions in your CRM system:

Before you can continue with the configuration in your CRM system, you must make some basic settings in the eworx Marketing Suite.
Configuration in the eworx Marketing Suite – Part 1
In this step, you create your organisational settings in the eworx Marketing Suite. To do this, go to “Administration” (top right in the user area) > “Integrations” > “Configure CRM Online”.
If you have access to multiple accounts in the eworx Marketing Suite, you can apply the following settings to multiple accounts at once (simply tick the desired accounts at the beginning of the configuration).
IMPORTANT: Please note the help provided by the eworx Marketing Suite for each field! Please also note that the specified URL for the CRM system is also accessible outside your company network for certain installation variants. Take the necessary precautions to enable access to your CRM system. Please ensure that you also specify the organisation name when entering the URL for the CRM system. This can be specified either as a subdomain (e.g. https://.crm4.dynamics.com) or at the end of the URL (e.g. http://crm/).
Now fill in the relevant fields and save your settings. Leave the CRM user and CRM password fields blank; these settings are legacy and are no longer required for new installations.

In the “Activities” section, you can generally keep the default settings unless you want to make specific changes. Detailed information about the settings you can configure under “Synchronise subscriber data” can be found later in the instructions. Here, too, it is sufficient to keep the default settings for the time being. However, what you should definitely pay attention to here is the decision as to whether the reactions (click and open rates) should be transferred to your CRM system ABSOLUTELY or RELATIVELY (see the 3rd screenshot below):


Once you have made your settings and saved your data entry (using the “Save” button), the “Prepare eworx Marketing Suite” button and the “Company Units” tab will become active:

Then click on the “Prepare eworx Marketing Suite” button to proceed to the next step and continue configuring your CRM system:

Microsoft Entra
Add the Azure application “mailworx Dynamics CRM Connector” to your MS Entra company application by calling up the following link as an administrator and granting approval for the entire organisation.
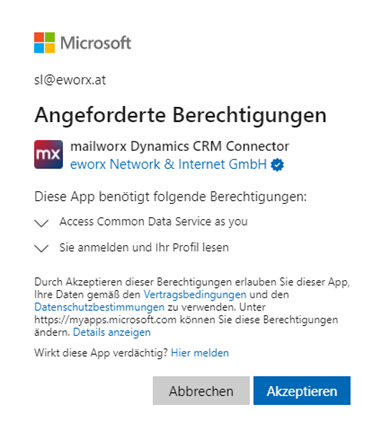
Create an application user for Dynamics by opening the Power Platform Admin Centre an administrator.
Select the desired environment under the Environments setting, and then select Users and Permissions/Application Users in its settings.

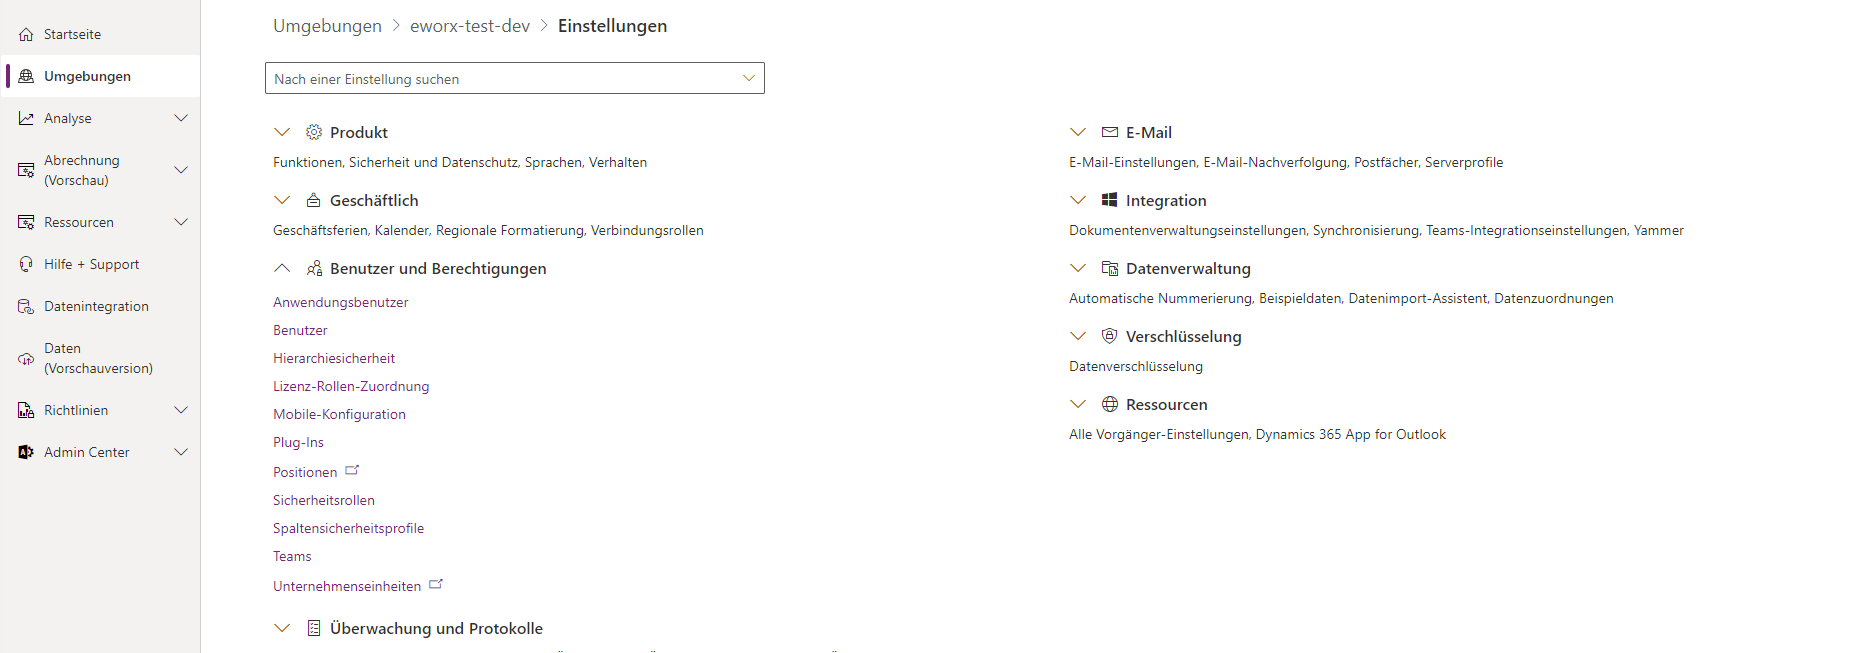
Select the “New App User” option and then select the “Add an App” menu item in the sidebar. Here, you must explicitly search for the application ID of the application (367be6ba-5d82-4b73-9f06-a9b70dd96b40), which does not appear in the list.
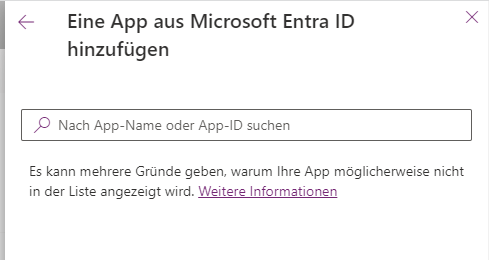
Then select the desired business unit (if several business units are available, select the highest-level business unit), assign the user the security role “System Administrator” and save the settings.
CRM configuration
In this step, you will now make further configurations in your CRM system. In order to make the following configuration, it is necessary to display the eworx Marketing Suite settings of your CRM system. To do this, select Advanced settings “Customisations” > “Customise system” in the list of entities in the eworx Marketing Suite settings. On the right-hand side, you will find the “Areas in which this entity is displayed”. Set the “Settings” option to active, save the entity and publish this change:

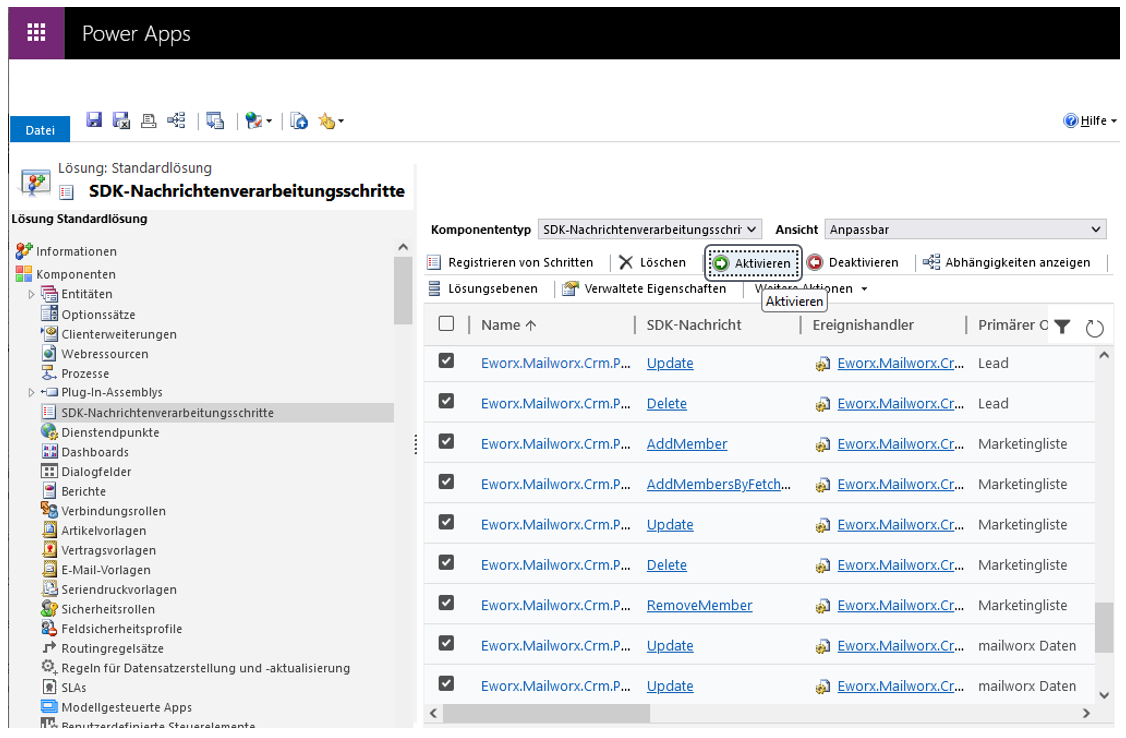
Before you configure the mailworx settings, activate the mailworx settings plugins. In the Advanced Settings under “Customisations” > “Customise System” > "SDK Message Processing", select and activate the following plugins:

After restarting your browser, you will see the “mailworx settings” in the “Extensions” section of the Advanced Settings.
Enter the eworx Marketing Suite web service URL(https://mailworx.marketingsuite.info/Services/IntegrationServiceAgent.svc) and the eworx Marketing Suite CRM web service URL (https://crm.mailworx.info) in the fields provided.

The “mailworx user” is the person who appears as the creator/editor of the synchronised entities in the eworx Marketing Suite. A regular eworx Marketing Suite user must be entered here, for example, the one used to create the “mailworx configuration – part 1” above.
However, for better traceability of changes in the eworx Marketing Suite, it is recommended to use a separate dedicated user here (e.g. with the name “CRM_Service”). This user must first be created in the user management in the eworx Marketing Suite. Since this user is not actively used in the eworx Marketing Suite, they do not need to be assigned to an authorisation group.
Then enter the mailworx password of the associated user and the activation key you received.
After you have saved the above settings, two new buttons will appear in the Advanced Settings under “Extensions” > “mailworx Settings” when editing the mailworx web service URL: "Check mailworx integration" and “Manual synchronization”.
Click on “Check mailworx integration” – this check takes about one minute and must be completed successfully:

After successful verification, click on “Manual synchronization” – this will synchronise the CRM attributes with mailworx:

In order to send notification emails via the application user, the user requires a valid email address and a corresponding Dynamics mailbox.
Both can be configured in the advanced settings under “Settings > Security > Users”. To do this, search for the user “mailworx Dynamics CRM Connector” in the user list and open it.
Change the primary email address to the desired sender address for the notification emails and select “Approve email” from the toolbar (this can only be done by Exchange administrators).

Then use the three-dot menu to open the mailbox:

Approve the email again here and then select “Test and activate mailbox”.

mailworx configuration – Part 2
In the following, you will configure the company units and field assignments in mailworx. To do this, go to the “Administration – Integrations” area in mailworx.

First, create a business unit in the "Business Units" tab. Enter the name of the company unit (note: pay attention to upper and lower case) from your CRM system and determine who will be entered as the owner of the generated responses (clicks, opens) in your CRM system. Then click on “Save” (only then will the field assignments be activated):
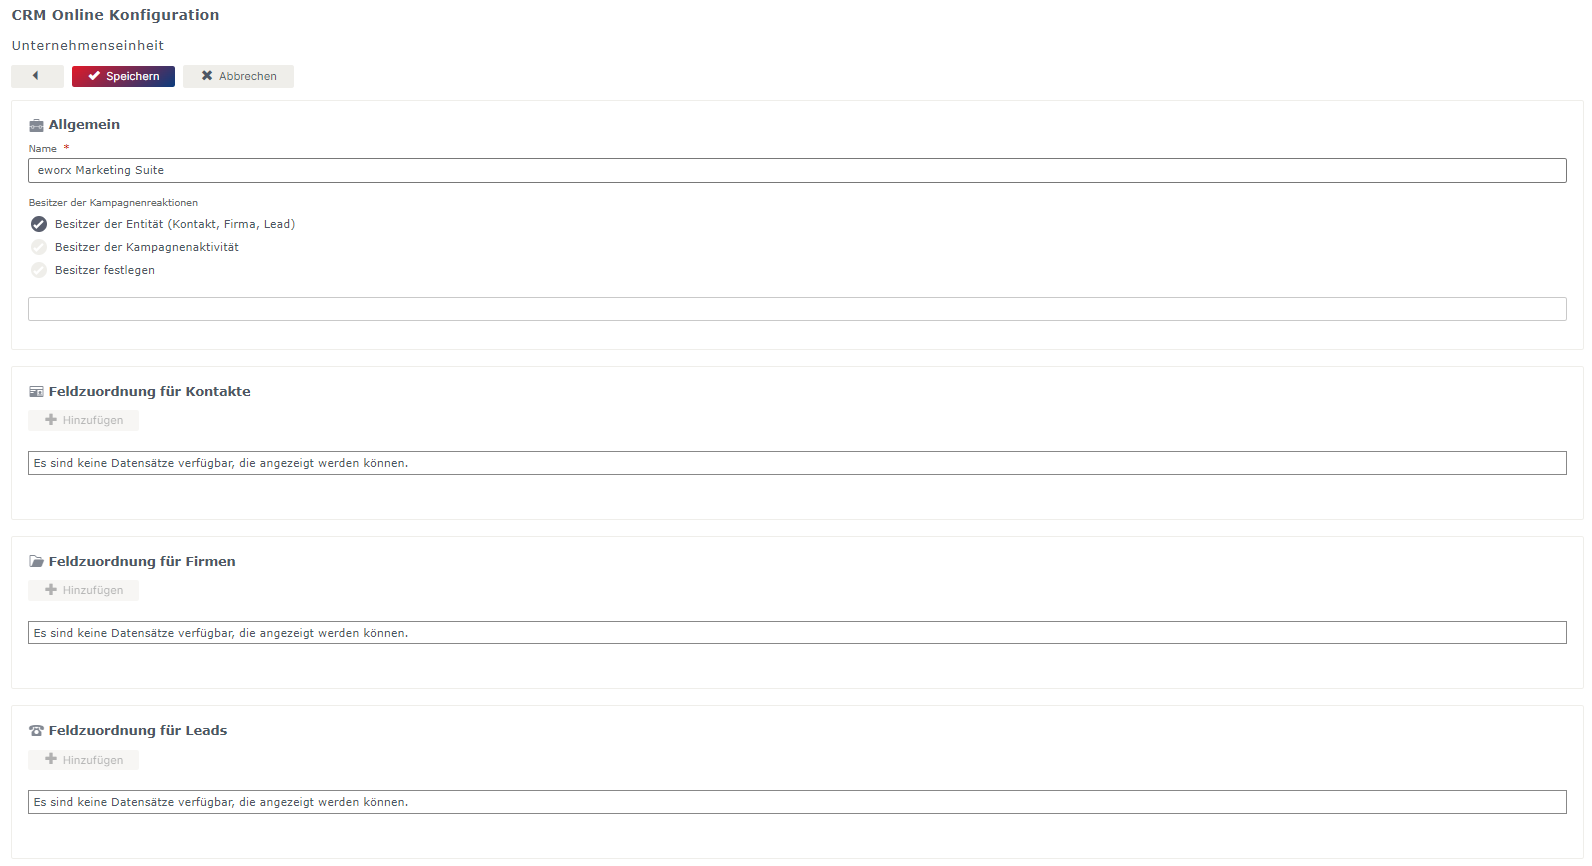
After saving, the buttons are active and you can configure the field mappings.
How can field mappings be added?
The attributes from your CRM system are available in the “CRM Field” drop-down menu (these were transferred by manual synchronisation in the “CRM Configuration” step). Here you can map simple fields (see screenshot below) or linked entities (see second screenshot):


Note: Transferring data for linked entities only works from your CRM system to mailworx, not vice versa.
You can also map single selection fields, as shown in the following screenshot:

Note: Mapping of multiple selection fields is currently not supported.
Where can I find an overview of my field assignments?
All mailworx subscriber fields used here are continuously updated with data from your CRM. The data for all subscriber fields that have NOT been mapped will continue to come from mailworx:

Note: Be sure to perform language mapping! Otherwise, all contacts/companies/leads will be transferred to mailworx using the default language of the mailworx client (usually German).
All configurations are now complete – you are ready to test!
What tests can be performed in advance?
Activate plugins
Before you can carry out the first tests in your CRM system, you must activate the plugins. In the Advanced Settings under "Settings” > “Customisations” > “Customise System” > “SDK Message Processing”, select all plugins from “Eworx.Mailworx” and activate them:
Assign roles
With the mailworx CRM Online Connector, you get two new security roles: “mailworx User” and “mailworx Administrator”. Assign the role “mailworx User” to all users so that they can use the full functionality of the mailworx CRM Online Connector. The role “mailworx Administrator” should be assigned to all CRM administrators.
Synchronise marketing list
To synchronise entities to mailworx, add them to a marketing list and synchronise them with the eworx Marketing Suite by clicking on the corresponding button. If the list is not yet synchronised in the eworx Marketing Suite, you can change this here.
Confirm the query with “yes” and your entities will be transferred.
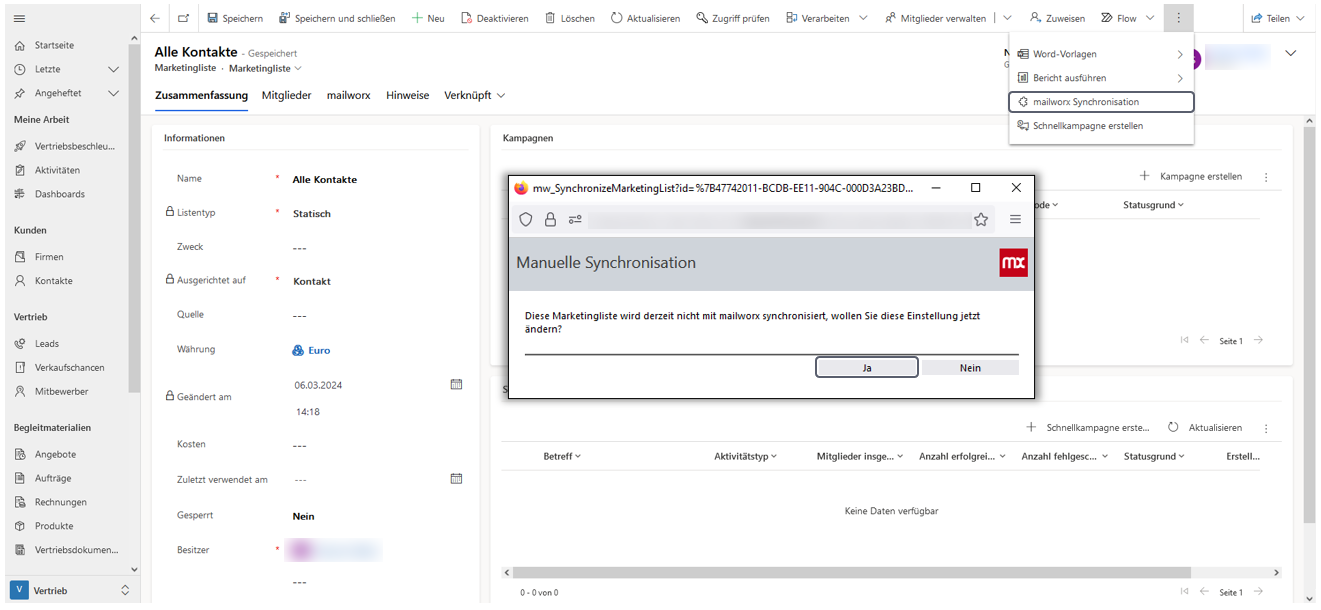
You will receive a success message when the synchronisation has been confirmed:

Note: Qualified leads are excluded from synchronisation to prevent the creation of duplicates in the eworx Marketing Suite, which would then have to be merged again later.
Distribute campaign activities
Distribute your campaign activities as usual using the “mailworx campaign” channel. Then enter the required information:

Based on your entries, a campaign and a subscriber group are created in the eworx Marketing Suite. Now create your newsletter in the eworx Marketing Suite and send it out.
Depending on the configuration in the eworx Marketing Suite, it may take some time for the responses (clicks, opens, returns) to be synchronised back to the CRM system.
Transfer responses
Once this has been done, you will see the campaignand the corresponding entity with the associated responses.

Synchronization of Subscribers and Subscriber Groups
Instructions on how to synchronize Subscriber Groups and Subscriber according to CRM can be found here.
The following white paper explains how to create marketing lists in CRM.
Here you will also find instructions on how to synchronize marketing lists from CRM to eMS.
Updated 2 months ago
