[EN] WhatsApp newsletter creation
Everything you need to know to create a WhatsApp newsletter
In times of direct and personal communication, WhatsApp newsletters are becoming increasingly important. WhatsApp offers an ideal platform for sending targeted information to your community quickly and reliably.
WhatsApp newsletters can be created and sent in the “messaging” module. However, you must first confirm that you agree to the use of third-party providers required to send the newsletters. Once you have confirmed this, you can start creating your newsletter.
In this whitepaper, we will show you step by step how to create a WhatsApp newsletter with the eworx Marketing Suite.
The path to the WhatsApp newsletter: All steps at a glance
In order to create a WhatsApp newsletter, you must first give your consent to the third-party provider (see above). The next step is to set up a WhatsApp Account and link it to the eworx Marketing Suite. A WhatsApp Template and a WhatsApp Newsletter must then be created. As soon as your WhatsApp newsletter has been sent, you can use the statistics to draw conclusions. You can find step-by-step instructions for creating your WhatsApp newsletter in this whitepaper.
How to set up the double opt-in process for your WhatsApp newsletter is explained in detail in the following whitepaper.
Step 1: Link a WhatsApp account
You can “Link a new account” under “WhatsApp Newsletter” > “WhatsApp Accounts”. As this process involves several steps, we provide you with detailed instructions for this. You will find instructions on how to set up your WhatsApp account in the eworx Marketing Suite in the following whitepaper.
As soon as consent for WhatsApp newsletters has been given in the eworx Marketing Suite, the system group “Active WhatsApp recipients” is automatically created. This makes it easier to get started with sending WhatsApp newsletters.
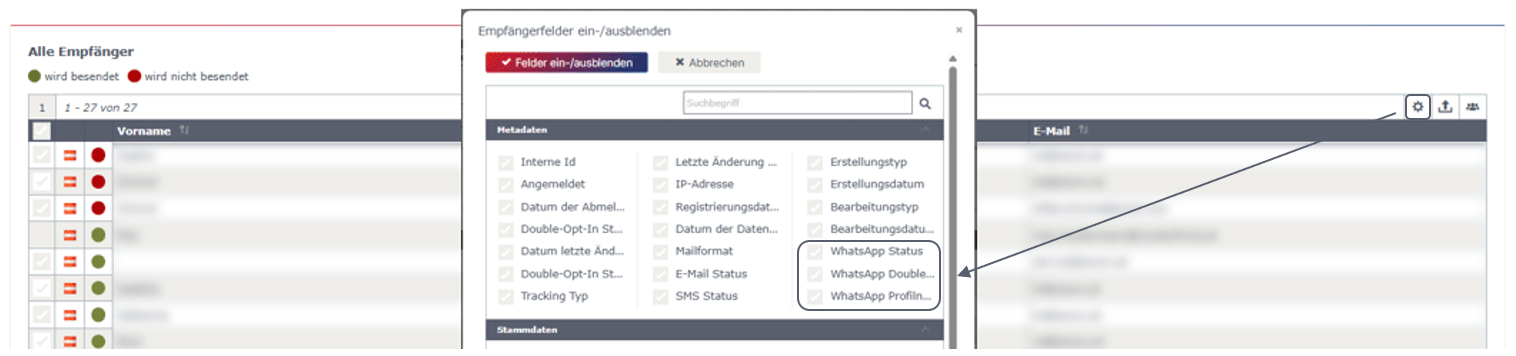
In the subscirber overview, it is also possible to display the WhatsApp metadata and export it as well.
Step 2: Create a WhatsApp template
Unlike email campaigns, the WhatsApp newsletter template does not refer to the design. The WhatsApp template contains the entire content and must be approved by Meta. In order to create a WhatsApp newsletter, a WhatsApp template must therefore be created first.
You can create a new template under “WhatsApp Newsletter” > “WhatsApp Templates”. To do this, click on the “Create new WhatsApp template” button.
As with other areas of the eworx Marketing Suite, you can also select an internal “Name”, an “Internal Description” and the "Language" when creating a “WhatsApp Template”. You can also see which WhatsApp account is linked in the first point of the WhatsApp template creation. The linked account is permanently stored with the eMS client and cannot be changed. It is only used to indicate which WhatsApp Business account the template is assigned to. If multiple Sender phone numbers are available, you can select the desired sender number here.
You can also choose between the template categories “Marketing” and “Utility”. Marketing templates are used to send your subscribers offers, product news, or other promotional content. They can be used both for WhatsApp newsletters and for event - based mailings. Administrative templates are used when a message is triggered by an action or request from the subscriber. They must not contain any promotional content or persuasive wording. The template category can be adjusted by Meta (e.g., from “Utility” to “Marketing”). This is enforced very strictly, especially if the content contains promotional elements (e.g., phrases such as “Find more information here”).
After clicking on the “Create and continue” button, further editing options are available. On the right-hand side, you will see a preview in which your changes are displayed immediately. Each step is saved automatically - an additional manual saving process is not required.

NOTE:
Please note that WhatsApp has strict guidelines for newsletter content. Messages related to alcohol, gambling, tobacco, weapons, certain financial offers, or misleading advertising claims may be blocked by Meta. We therefore recommend avoiding such terms and phrases to ensure smooth delivery of your WhatsApp newsletter.
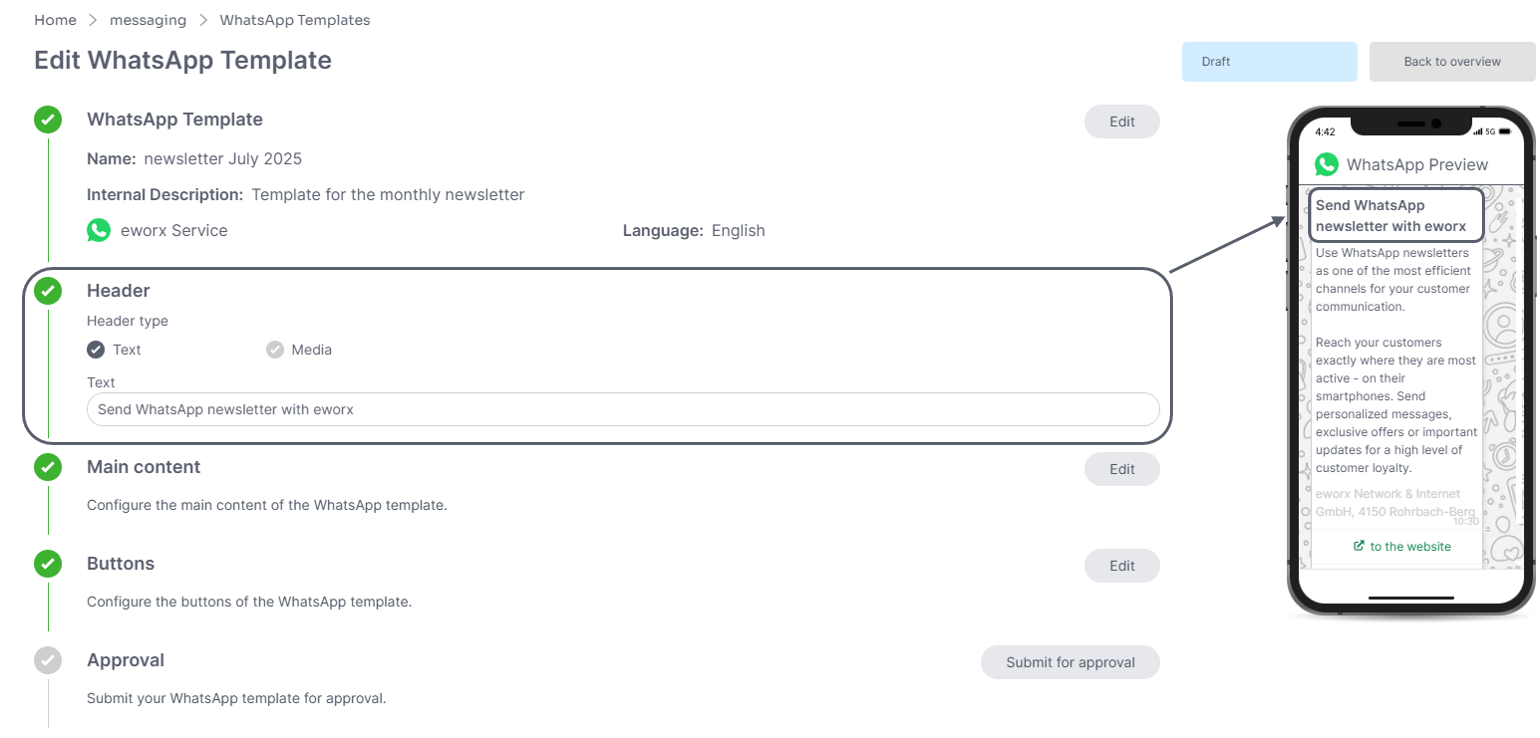
Header
For the “Header,” you can choose between text or media. Images and videos (mp4) are available as media. You can upload the desired file directly under this item. Please note that videos may have a maximum file size of 16 MB.
Once you have selected text or a media file in the header, you will see the changes in the preview on the right-hand side. If text is selected, it will be displayed in bold in the message.
Main content
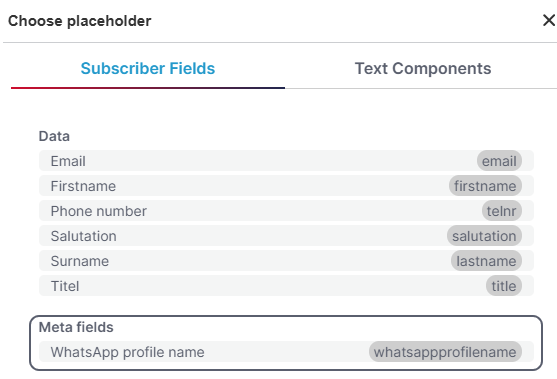
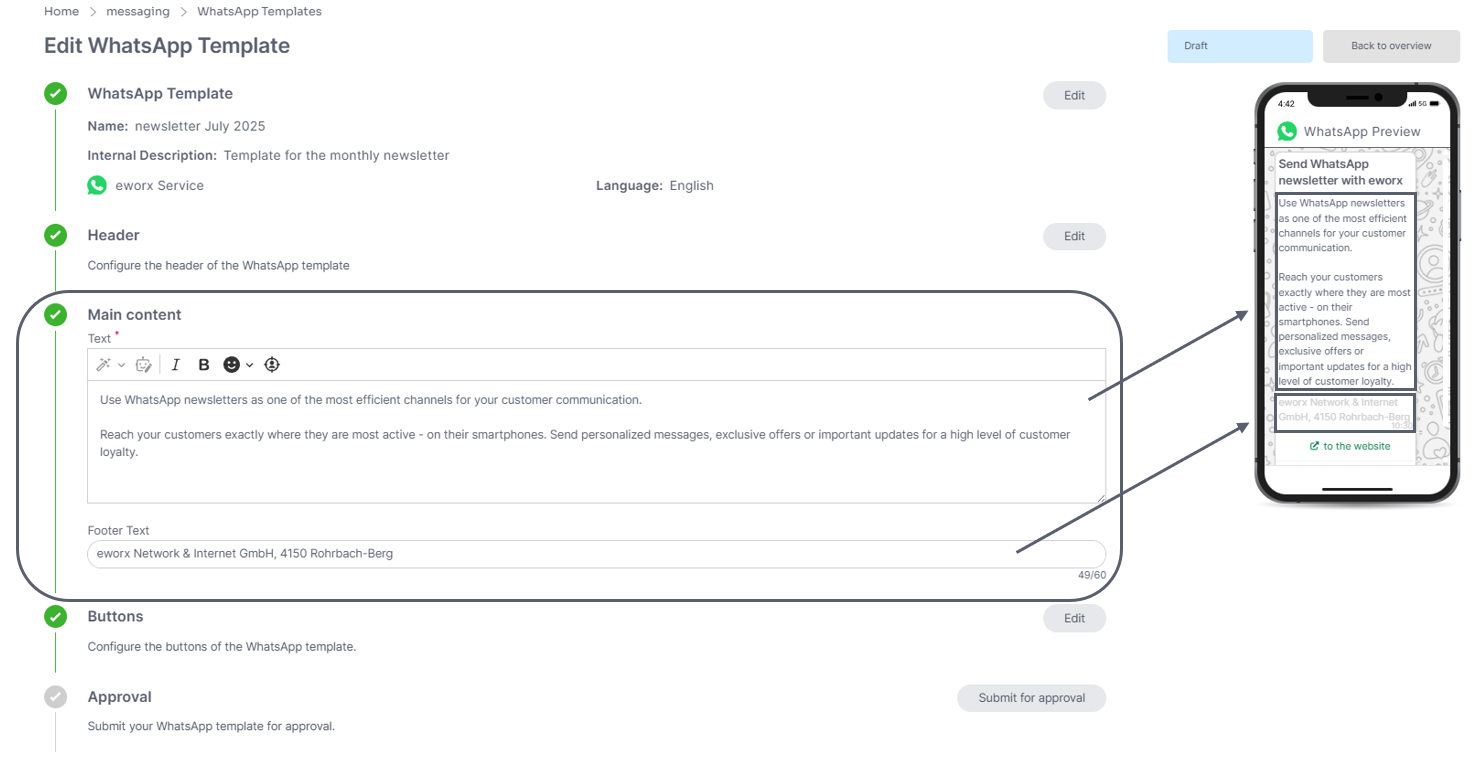
Click on “Edit” under “Main content” to open a text field with an integrated text editor. The AI Assistant is available there. You can format your text in bold or italics and insert emojis and placeholders for personalization elements. The WhatsApp profile name can also be used for all personalizations. It is captured in the “Click-To-Chat Message” of the WhatsApp double opt-in and stored as a “meta field” for the recipient.
Furthermore, you can not only add a main text, but also an optional “footer text”. This is displayed in light gray in the message.
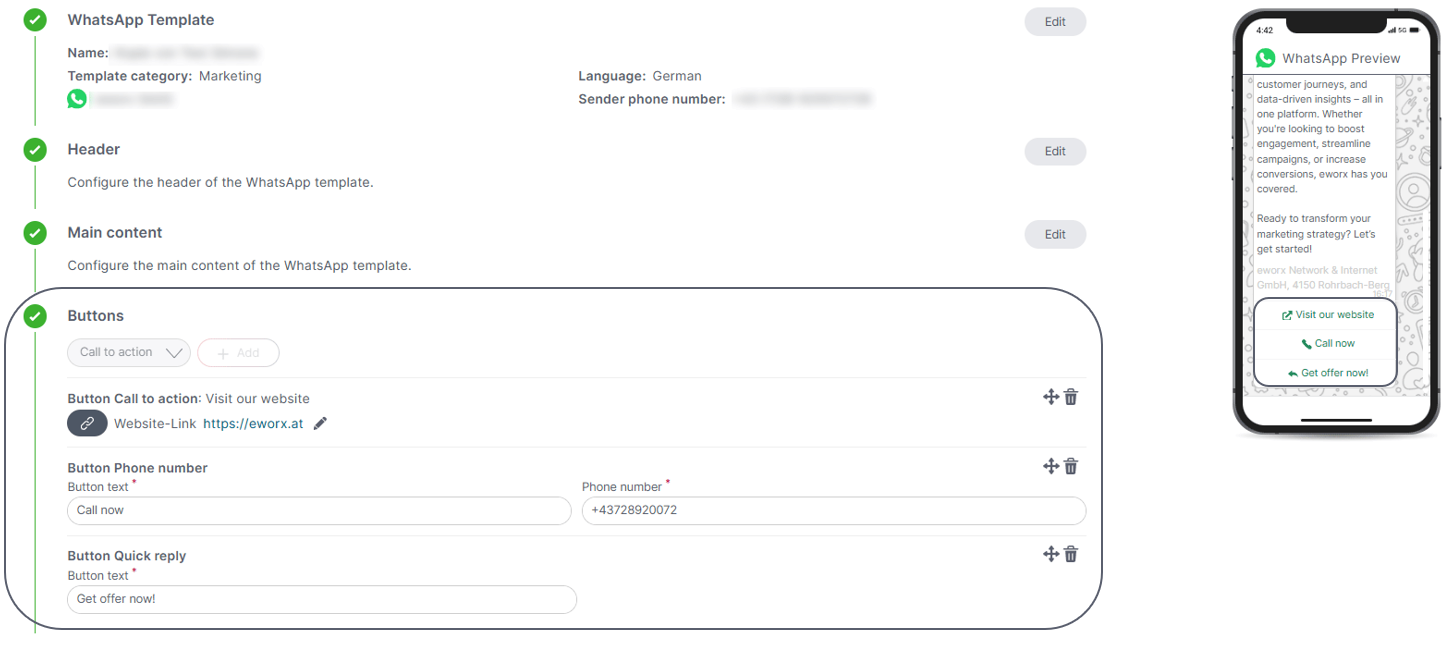
Buttons
You can also include buttons in the WhatsApp newsletter. Under “Button Type,” you can choose between Call-to-Action, Phone Number, and Quick Reply.
Depending on your selection, you’ll then need to enter button text and either a URL (for Call-to-Action) or a phone number. You can add up to three buttons in total.
Validation & Approval
In order to use your template for the WhatsApp newsletter mailing, you must submit it for approval in advance. . First, the template must be reviewed. This Validation includes suggestions for improvements (e.g., using a custom subdomain), a link check to ensure that the links work, and a verification that the WhatsApp Business account is active and the WhatsApp Business phone number is ready for sending. Afterward, the template can be submitted for approval.
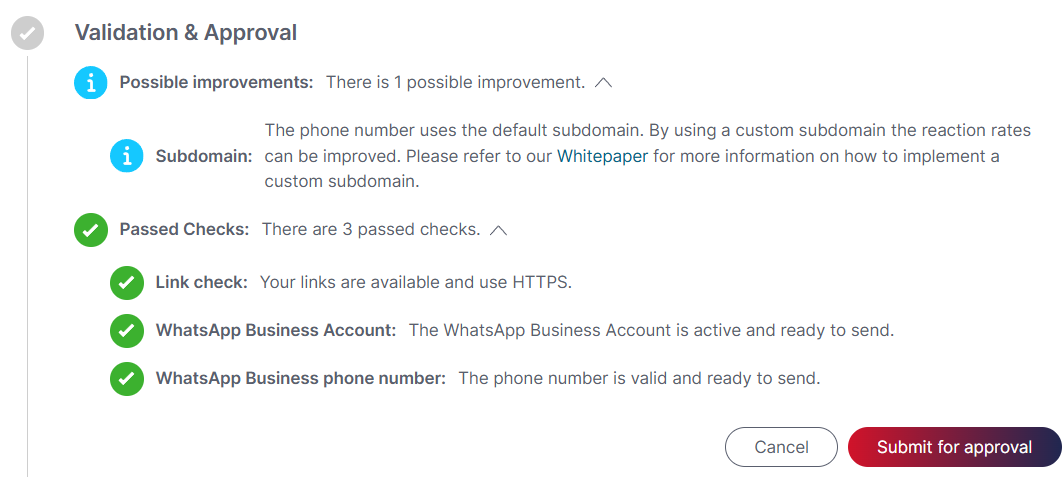
During the approval process, Meta checks the template to ensure that it complies with the guidelines for WhatsApp templates. The approval process is usually completed in a few minutes, but can also take longer under certain circumstances, up to a maximum of 24 hours according to Meta. Once your WhatsApp template has been approved, the status is changed in the eworx Marketing Suite. You will also receive a notification in the bell.
As soon as the review has been successfully completed, the template can be used for the WhatsApp newsletter dispatch.
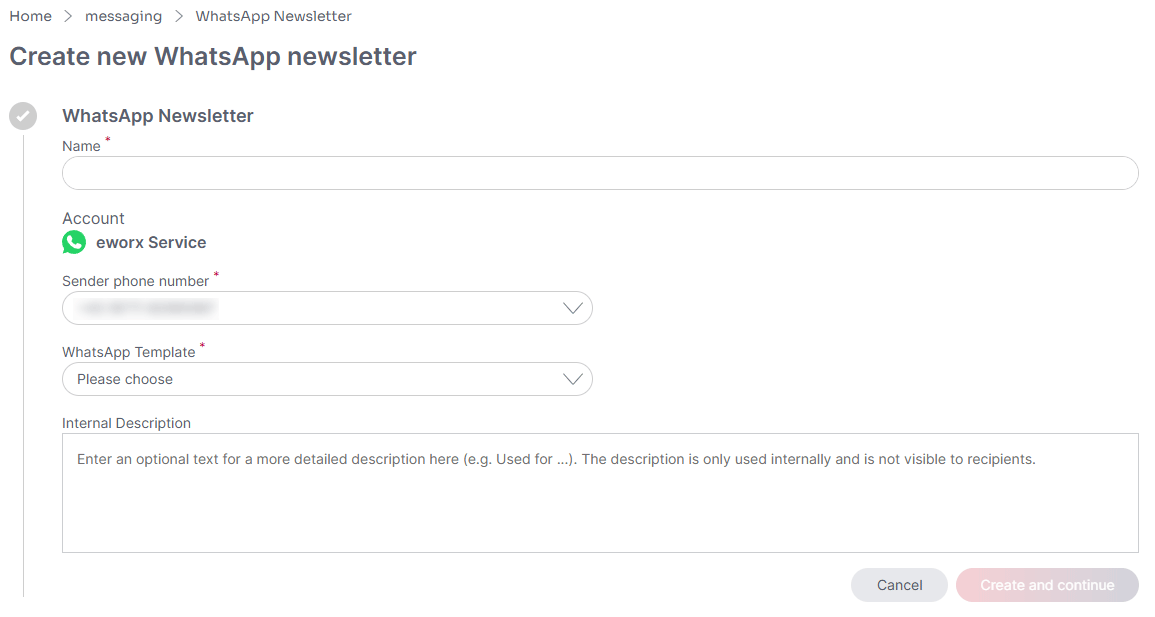
Step 3: Creating a WhatsApp newsletter
To create a new newsletter, go to “WhatsApp Newsletter” item and click on the “Create new newsletter” button.
When creating a new WhatsApp newsletter, you must first select the internal "Name" of the newsletter, optionally an "Internal description", the "Language" and the "Sender phone number". If several WhatsApp Business phone numbers are linked to your WhatsApp account in the eMS, you can choose between the different numbers here.
Name
The name of the WhatsApp newsletter is only visible in the system. However, this internal name is not displayed in the newsletter itself. It is best to use meaningful names to make it easier to find later.
Account
Here you can see the WhatsApp account that you have linked under “WhatsApp Accounts”. Currently, only one account can be stored here. The linked account is permanently stored with the eMS client and cannot be changed; it is used here to indicate the WhatsApp Business account from which the newsletter is sent.
Sender phone number
Here you can select the desired WhatsApp Business phone number with which the WhatsApp newsletter should be sent. Under “WhatsApp Accounts” you have the option of adding a new phone number.
WhatsApp Template
Here you can select the desired WhatsApp template, which has already been created in advance (see above).
Internal Description
The “Internal Description” is used for internal notes, for example when several users are working in the system. These notes are only visible in the system. However, the internal description is not displayed in the newsletter itself.
As soon as all the details have been entered, you will not only see a preview of the newsletter on the right-hand side by clicking on the button, but you will also have the option of creating your WhatsApp newsletter step by step.
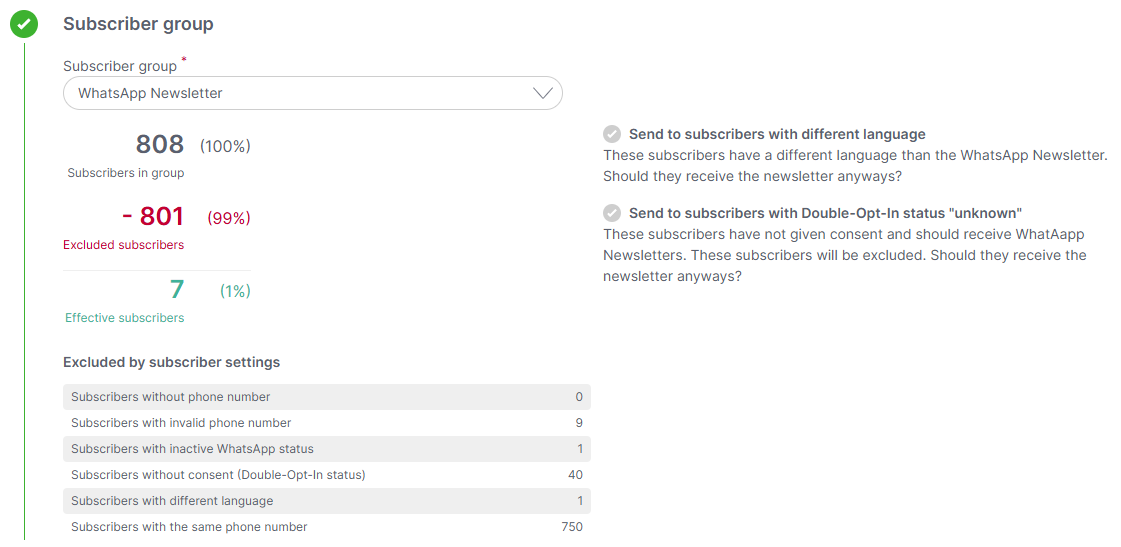
Subscriber group
As it is important to send content to specific subscriber groups, you have the option here of selecting a subscriber group with subscribers for your newsletter that has been created in advance. Subscriber groups can be both static and dynamic and form a central element in the structure of the eworx Marketing Suite. You can find more detailed information on subscriber groups here.
Once you have selected your subscriber group, the number of effective subscribers is automatically displayed in the eworx Marketing Suite. This is calculated from the subscribers included in the subscriber group minus the subscribers excluded from the mailing. Subscribers can be excluded from sending for various reasons. These are displayed in the overview, allowing you to track the deviations.
As soon as a subscriber group has been selected, the preview area on the right-hand side can be personalized for a subscriber from this subscriber group.
Send to subscribers with different language
Subscribers with a different language are automatically excluded from sending a campaign in a different language. By clicking on the checkbox, you can also send subscribers with a different language than the one stored in the newsletter. This option can only be selected if your user has the corresponding authorization.
Send to subscribers with Double-Opt-In status "unknown"
Subscribers who have not (yet) given their consent to receive your newsletter are automatically excluded from receiving it, as they may not be sent. If you would like to send them anyway, you can also send these subscribers by clicking on the checkbox provided for this purpose. This option can only be selected if your user has the appropriate authorization.
Subscribers who have unsubscribed from the WhatsApp newsletter and have therefore revoked the "double opt-in status" can no longer be sent.
You can find more information on “double opt-in” in the following whitepaper.
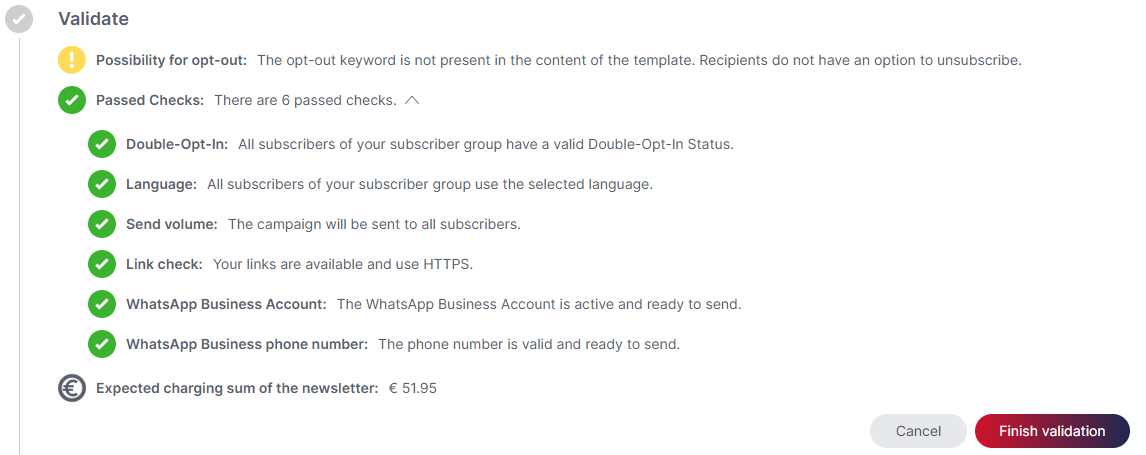
Validate
Before you can send your newsletter with the eworx Marketing Suite, all content and settings that affect the delivery or display of your newsletter are checked. The check results will then show you what could be improved or which errors have occurred.
You have the option of viewing details of the individual results. The marking in the traffic light system helps you to decide which of the emerging problems should be prioritized.
Send volume:
This checks whether the newsletter can be sent to subscribers. For example, an error message appears if the subscriber group does not contain any effective subscribers. It is also checked whether the number of effective subscribers in the subscriber group exceeds the sending limit for the sender number.
Personalization:
If you use personalized elements in your newsletter (e.g. “Subscriber Fields”, “text modules”), the system checks whether all subscribers from the subscriber group contain all the necessary data to display the personalization correctly.
WhatsApp Template
A check is performed to ensure that the WhatsApp template used has already been approved by Meta. A WhatsApp newsletter can only be sent using an approved template.
Double opt-in:
This item checks the “double opt-in status” of your subscribers. Among other things, it is checked whether there are subscribers with the “Double opt-in status” ‘Unknown’ or “Revoked”.
Link check:
This checks whether all the links in your campaign are accessible and use https. It is important to ensure good accessibility so that subscribers are not deterred from possible interactions by faulty links.
WhatsApp Business Account:
It is checked whether the WhatsApp Business Account is active and ready to send.
WhatsApp Business phone number:
It is also checked whether the phone number is valid and ready to send.
Language:
Subscriber with a different language are excluded from sending by default. This setting can be overridden under “Subscriber group”.
Expected charging sum of the newsletter:
This item is always displayed and is only used to inform the user. The expected billing amount does not affect the sending itself. WhatsApp newsletters incur costs per message sent, which may vary depending on the destination country of the message. Displaying the expected costs ensures the greatest possible cost transparency and control for the user.
Sending
In order for the WhatsApp newsletter to be sent, the verification must first be carried out and completed. Sending can then be configured. You can decide whether the newsletter should be sent now or later. If you select the "Send later" option, the planned sending can be canceled.

Step 4: Analyze WhatsApp statistics
The WhatsApp statistics section provides you with an overview page for WhatsApp newsletters. All WhatsApp newsletters that have been sent are clearly listed there.
At a glance, you can see important key figures such as the time of send, the number of subscribers to whom the newsletter was sent, and how many messages were delivered, opened, and read. In addition, it shows how many subscribers reacted to the newsletter.
Each newsletter can also be analyzed in detail to view further information and statistics.
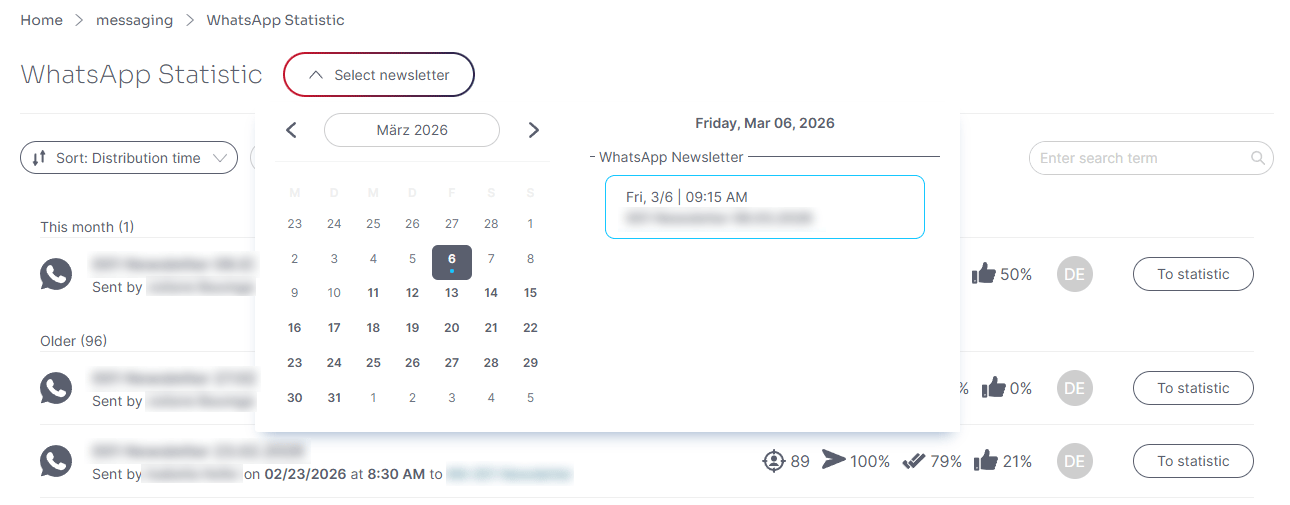
The WhatsApp statistics give you an overview of the success of each individual newsletter. Click on the “Select newsletter” button to open a calendar. The days on which you have sent or scheduled newsletters are marked with a blue dot. To the right of this, an overview of the WhatsApp newsletters sent on the corresponding day opens.
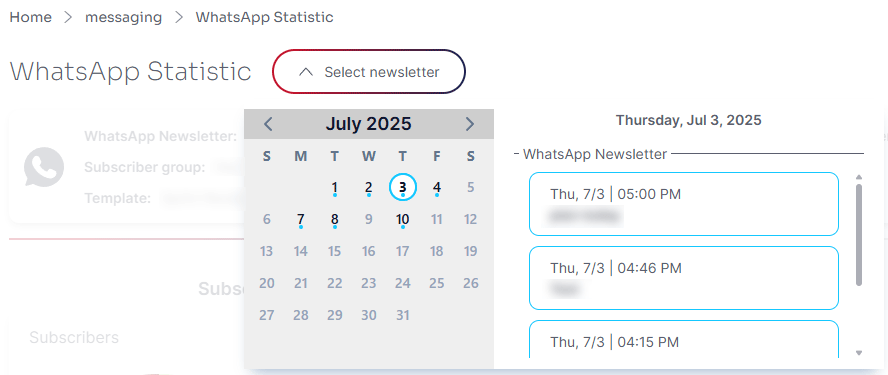
Once you have selected the desired newsletter, an overview of all the key data for the WhatsApp newsletter will appear.
You will find the following facts in the overview of the selected newsletter:
- Name of the WhatsApp newsletter: The name you selected when creating the campaign appears here - the name is only visible to you, your subscribers will not see this name.
- Subscriber group: Here you can see the Subscriber group to which you have sent your WhatsApp newsletter.
- Template: Here you can see at a glance which WhatsApp template was used for the mailing.
- You can also see when the WhatsApp newsletter was sent and can view the newsletter again using the “Go to newsletter” button.
You can use the Switcher tab to display the detailed key figures for the selected campaign (recipients, delivery and response).
Subscriber
Here you can see at a glance how many subscribers the campaign was sent to, the circle diagram and the list also shows an overview of the excluded subscribers and the breakdown by exclusion reason.
By clicking on the “detail view” button, you will receive a list of the respective subscribers. You can add the subscribers in this list to a static subscriber group.

Delivery
The “Delivery” tab shows the percentage of WhatsApp newsletters that have been delivered, not delivered or are still in progress.
By clicking on the “detail view” button, you will receive a list of the respective subscribers. You can also add the subscribers to a static subscriber group. It is also possible to filter by status (Delivered, In Progress and Not delivered).
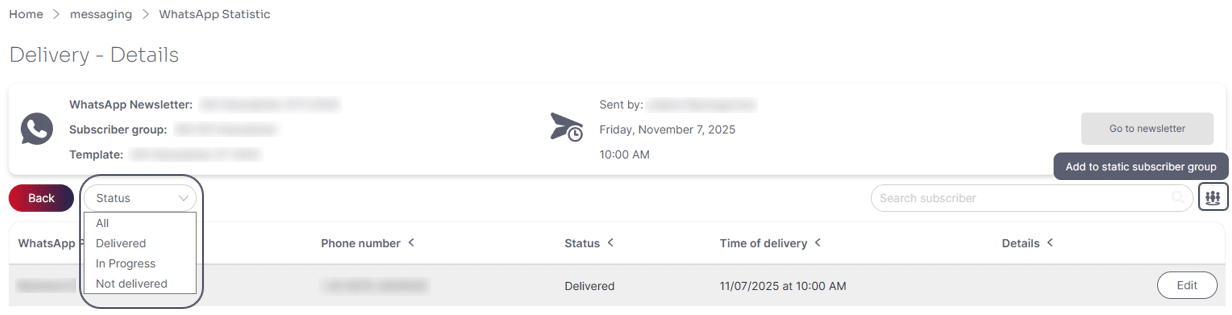
The delivery details in the WhatsApp statistics also show detailed information for undelivered messages.
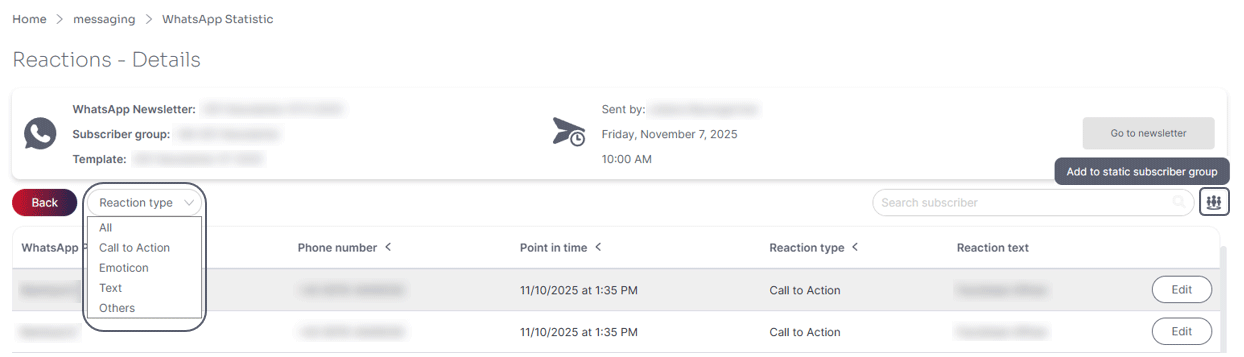
Reactions
Here you can see which subscribers have reacted to the newsletter. Reactions are either a click on a link or button, or a reply to the newsletter message. Responses can be received as text messages (free text), emoticons or via other WhatsApp response options such as media, location or contact.
The “detail view” button can be used to view the type of response and the response text. You can also filter according to the “Response type”. It is also possible to add subscribers to a static subscriber group.
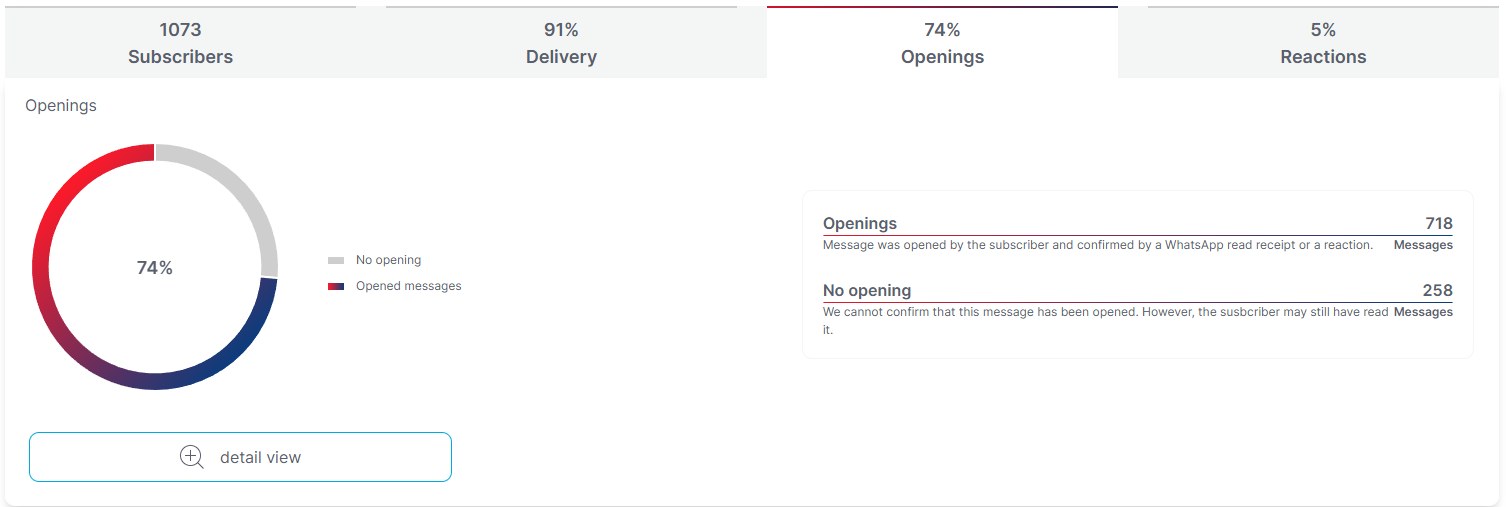
Openings
WhatsApp statistics also record and evaluate WhatsApp message openings. A distinction is made between “openings” and “no opening”.
An opening is counted when a message has been opened by the subscriber and this is confirmed by a WhatsApp read subscriber or a reaction to the message.
“No opens” refers to messages for which there is no confirmed opening. In these cases, it cannot be clearly determined whether the recipient has opened the message – however, it is possible that the message has still been read.
unsubscriptions statistics
From now on, unsubscriptions related to WhatsApp messages will be shown directly in the statistics. The tile contains the following information:
- How many subscribers unsubscribed immediately after receiving the newsletter
- How many subscribers unsubscribed more than 2 hours after receiving the newsletter
- How many subscribers unsubscribed more than 24 hours after receiving the newsletter
- Average unsubscribe rate for the last 12 months
If another message is sent via our system between the newsletter dispatch and the unsubscription, the unsubscription is no longer assigned to the original newsletter.
The detailed list can be filtered by unsubscription periods and also exported as a static subscriber group.

Updated 2 months ago