
[EN] User Management
User management options vary depending on the solution model used.
Professional
In the Professional solution model, user management is handled by the eworx Service Crew. Independent management or creation of users is not possible in this model.
The scope of services includes up to five users. If you need additional users, they can be purchased separately. We’d be happy to provide you with a customized quote.
Would you like to create, modify, or remove a user?
Simply contact the eworx Service Crew - we’ll make the necessary changes for you.
Enterprise
In the Enterprise solution model, users can be managed independently. Administrators have the ability to
- create new users a,
- edit, lock, or delete existing users zu x6F;s, x6F;or delete sthem, as well as
- create permission groups mwith individual permissions and assign them to users.
Create a New User
An administrator can create a new user.
- Open the “Administration” menu item in the upper-right corner of the user area.
- Go to “Users”.
- Click “Add User”.
- Enter the user data and save the new user.
Important: After creating the user, you should assign them to an appropriate permission group z. Only then will the user receive the desired access rights.
- After saving, the “Roles” tab appears, where you can select the appropriate permission group and assign it to the user. This ensures that the user can only access the areas intended for their work.
- If you have multiple clients, you can select the desired clients to which the user should have access in the “Accounts” tab.

Creating and Assigning Permission Groups
How do I create a new permission group?
Under “Administration” (top right of the user area), you'll find the “Roles” menu item in the page navigation. Here you’ll find the standard system permission groups, and you can also “Add a new permission group” as well as edit the permission groups you’ve created.
When creating a new permission group, you must enter a name for the permission group. You also have the option to enter a comment as a note. This will also be displayed in the permission group overview. Furthermore, you can define a maximum number of emails for the permission group if users with this permission group are to be restricted when sending emails. You can also configure which toolbar (Text Editor) should be available to users.
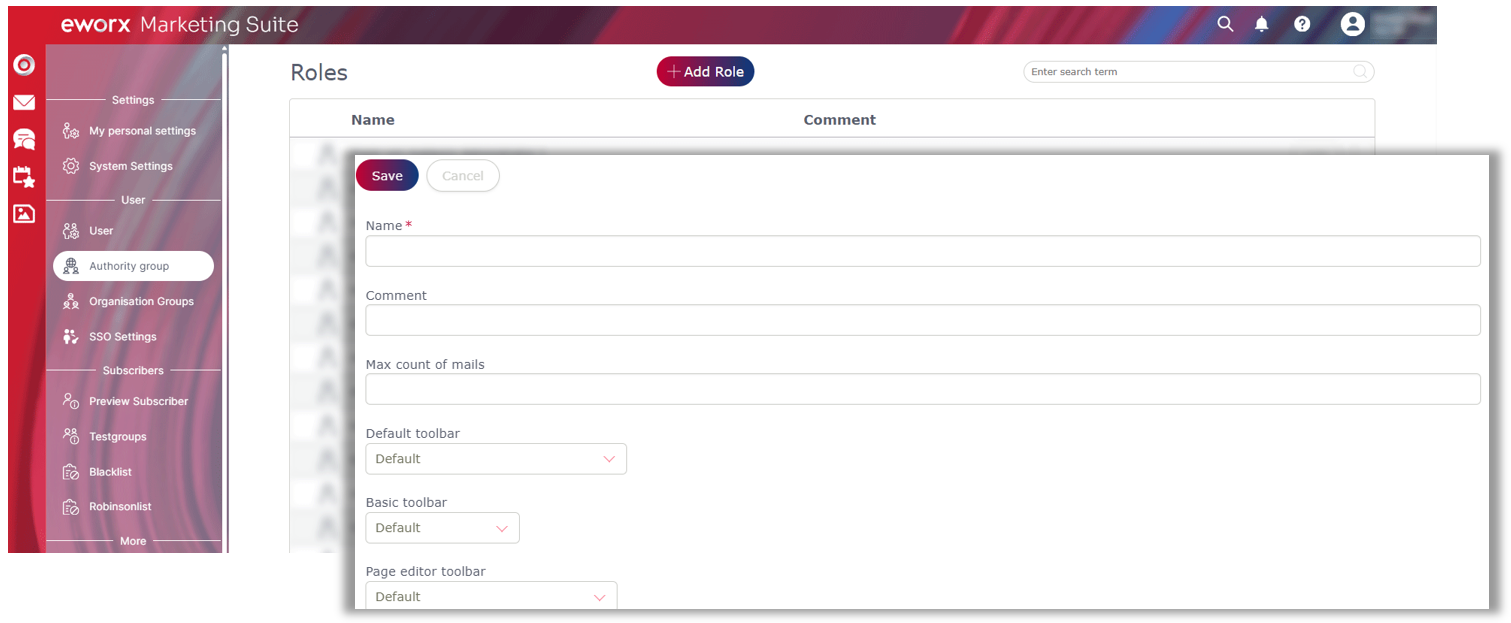
After saving the settings, the “Roles,” “Users,” and “Accounts” tabs will appear.
In the “Roles” tab, you can now assign the desired permissions. Users who are assigned the permission group will have the permissions defined in that group. For example, if a user is assigned multiple permission groups, the permissions from those groups are combined.
You can see which users have been assigned the permission group in the “Users” tab.
Information on which clients the permission group is available in can be found in the “Clients” tab of the permission group. Here, you can also add the permission group to other clients.
How do I assign a authority group to a user?
Under “Administration” (top right of the user area), you’ll find the “Users” menu item in the page navigation. Here, you can create new users or edit existing ones. When editing an individual user, you can select the desired permission group for that user in the “Permission Groups” tab.
Updated about 1 month ago