[EN] Event Check-in
Event check-in can be so easy
In this whitepaper, we show you how to use the eworx Marketing Suite to send QR code tickets and how the Event App saves you a lot of stress on the day of the event.
What type of link do I need to use for QR code tickets?
Below you will find a guide to the preparations you should make in advance and which link type you need to use in the campaigns.
Before you place the link to the event ticket in your campaign, first prepare a registration form and the associated event.
For the registration confirmation, now create an event-dependent email campaign that the guest will automatically receive after submitting the registration form.
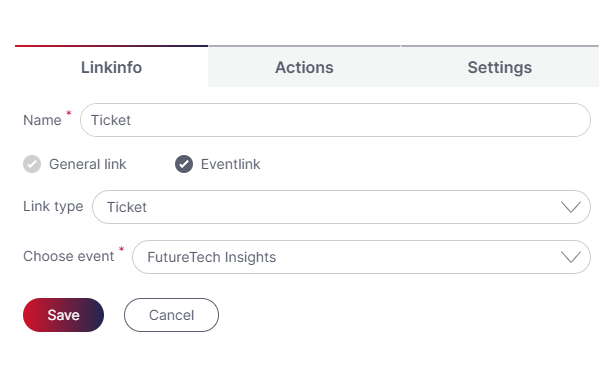
In this campaign, create a link with the type „Event ticket“. In the drop-down menu you now only have to select the corresponding event.
The pdf ticket with QR code will be automatically generated for each subscriber. It contains:
- – Key data of the event (name, location and period of the event).
- – Details of the guest (all fields visible to the guest from the registration form)
- – accompanying persons
- – QR code for quick check-in at the event.
Advise the guest to bring the ticket to the event – printed or digitally on the smartphone.
Tip: Carry out registration on a test basis. Use the „switch to preview view“ link in the campaign editor to check the contents of the ticket. Integrate your logo on the ticket by uploading it under „Administration / System settings / Standard layout“ (only visible to mailworx administrators). Note, however, that this logo will also be displayed on standard forms such as the unsubscribe form or the data change form.
What do I have to prepare for a stress-free check-in?
In order to scan the QR-code of your guests on the event day via smartphone or tablet you need a QR-code reader on your device. The online event app will open by scanning the QR-code in the tab ‘Check-in’ of the respective event or by clicking the relevant link. Entry is locked by a pin code that can be found in the tab ‘Check-in’ which can also be edited. It is also possible to temporary activate the pin code for testing issues. Otherwise the pin code is valid during the event as well as 6 hours before and after the event.
In the tab ‘Check-in’ you can add a campaign that will be sent automatically for confirming the attendance. This will inform your subscribers about changes or general information about the event.

Which opportunities do I have with the event app?
Opening the event app – that does not have to be downloaded from the app store – will show the status of the event as well as name and location. Here you find a pie chart for a perfect overview over your attendees.
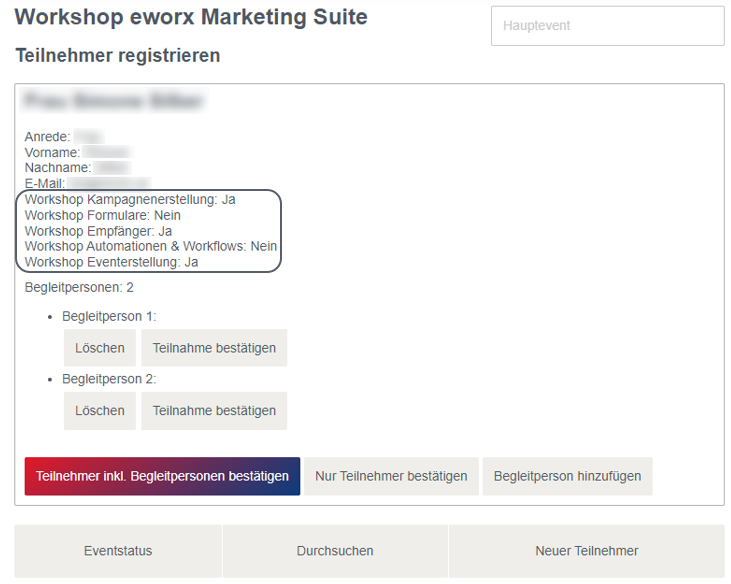
You have the possibility to note if a subscriber actually attended the event:
- Scanning the QR-code ticket
Scan the QR-code and change a subscription into a attendance with just one click. If companions are allowed you can register both, guest and companion, as attendees. If a guest comes without companion you can also check him in without his companion. - Choosing from the guest list
Almost as fast as checking in with the QR-code you can find your guests by searching him in the event app. When a guest forgot the ticket he can be registered from the guest list. - Add a new guest
If a guest comes without registration you can add him to the guest list afterwards.

How does the check-in work for partial events?
When checking in, it is possible to select the desired event in the event app using a drop-down field. You can choose between the main event and the individual sub events. The selection is saved on the device used.

It is also possible to switch between the different check-ins in the event app.

Check-in can be done with only one QR code for individual sub events. If a QR code is scanned, the corresponding guest is registered as a participant for the main or partial event previously selected in the event app.
If, when scanning a QR code, it is detected that the guest is not registered for the previously selected partial event, a notification is displayed so that appropriate action can be taken.
On the event ticket, as well as when scanning the QR code, the fields that are stored in the event form (e.g. partial event fields) are displayed. Thus, for example, it can be recognized for which partial event the guest has registered. How the fields of the form are displayed on the event ticket or in the event app depends on the labeling of the field in the event form.

How do I proceed if I have accidentally registered the guest for the main event, but I only want to register him for a partial event?
There is an option to change the „event status“ of the guest. In this case, the main event would need to be selected in the event app (if this is not already selected).
Then the guest must be searched for using the search function. Once the guest has been found and selected, the „participation can be revoked“. Then, in this example, the desired sub event can be selected in the event app to be able to change the guest’s event status for the part event.