[EN] events – efficient transaction of events
Successful communication – before & after the event
The fully integrated eventmanagement feature of the eworx Marketing Suite provides every step to plan communication before and after an event. Additionally, you can automate registration as well as guest list management.
In this whitepaper you get to know step by step how to use the events app within the eworx Marketing Suite.
What do I have to consider when creating an event?
In case the event app is activated for you, you will find it in the main menu of the eworx Marketing Suite under ‘events’. By clicking the button ‘New’ you have the opportunity to ‘Create new event’, ‘Create new event with assistant’ or ‘Create event based on existing event’.
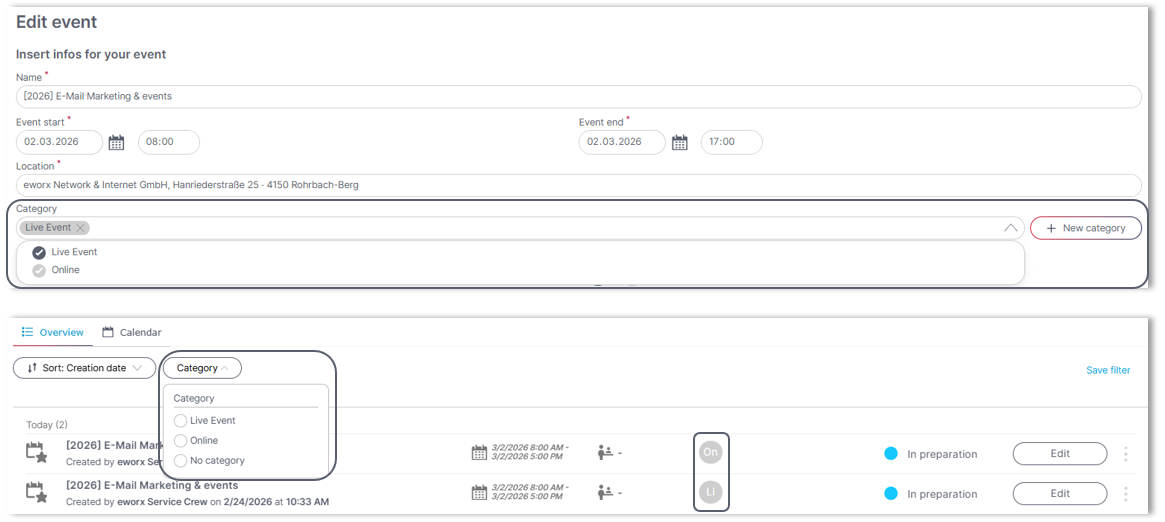
When creating a new event you first have to fill out the information for your event. In the field ‘Notifcation address’ you an define an email address that will be informed if there would be any problems with sending the campaign (e.g. overriding the send limits or empty event groups).
The field ‘Description’ is for internal notes.
You also can define a ‘Text in calendar entry’, the information given will be set automatically for the link type ‘Calendar entry for event’ which you can use in your email campaign in the ‘Add link’ window.
Also choose the ‘Used cultures for the event’. Multiple selection is also possible in order to match different campaigns with different languages to an event. In the case of multilingual events we recommend to create an international subscription form in English. You can also edit these settings by clicking the ‘Edit’ button in the information of your event.

Right after creating the event you get an overview on the event dashboard where you can see all information about your event on top of the dashboard. It also provides a tile for the ‘Event forms’, the ‘campaign activities’ that are planned for the event, a pie chart with the ‘Guestlist’, the ‘Calendar entry’ which shows the text and can be changed into a Microsoft Teams meeting, as well as the ‘Check-in’ with QR-code
All details to the single tiles are given in the following.
Event Calender
In the Events section, you will not only find an overview of your events, but now also a calendar. This tab provides a clear view of your events, sorted by date. The current calendar week is displayed by default and the current day is highlighted in gray. Clicking on an event activity in the calendar brings up a pop-up window displaying additional information and allowing you to perform further actions (edit, copy).
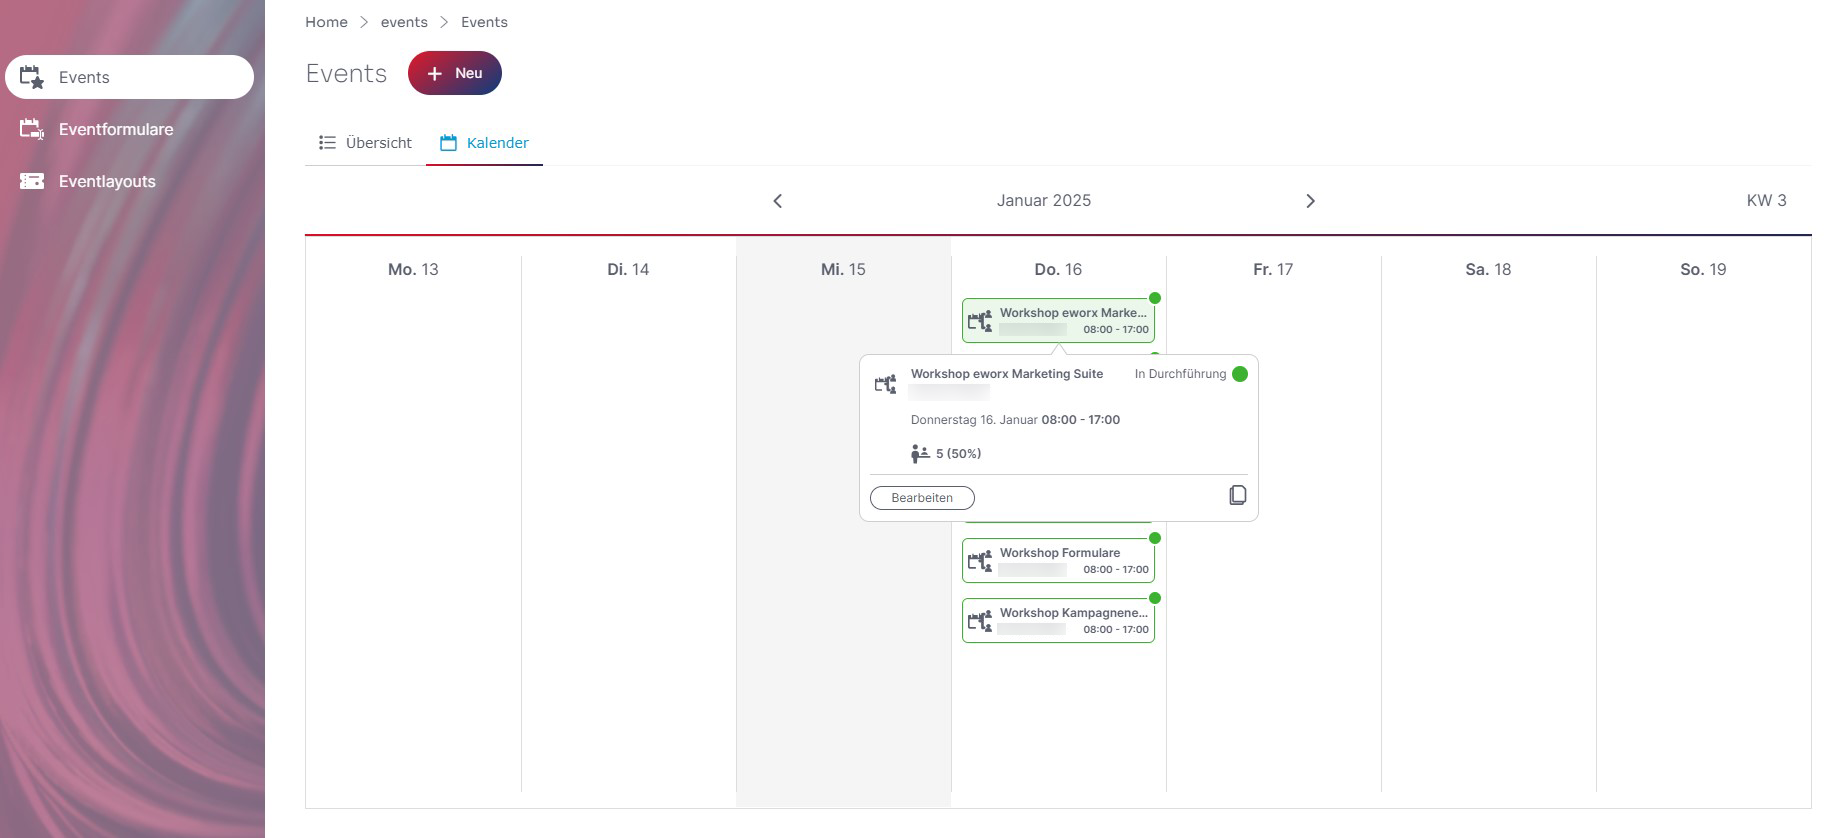
Event categories
After creating an event, categories can be created and saved directly with the respective event. This allows events to be structured thematically and organized clearly.
The assigned categories are visible both in the dashboard and on the event overview page. In addition, it is now possible to filter the overview page by category. This allows you to find relevant events even faster and keep track of them even when there are a large number of events.
How do I create an event form?
On the event dashboard you are able to choose a existing form for your event or create a new one. When creating a new form you can decide if the form should be a completely new one or a copy of an existing one. After saving the settings there will be more tabs and opportunities in order to edit the form.
You also have the possibility to manage your event forms or create a new one under ‘Events’ > ‘Event forms’.

In the following whitepaper, you will learn how to create and use an event form for your event correctly.
What campaigns can be sent out during the event?
Further information on planning and implementing campaigns as part of events can be found in the following whitepaper. It describes how campaigns can be used throughout the event process and tailored to suit the event’s content.
How can I create an online event with link?
If your event is an online event you can add a link to your meeting tool (Google Meet, Zoom, Webex, Skype, MS Teams) in the ‘calendar entry’ as event location.
When adding the link type ‘event date’ to a campaign the system recognizes automatically that it is an online event and the location will be changed into a link to the online meeting. The system also adds start as well as end date and the event description to the calendar entry automatically.
How am I able to look up the registration status of the guest list?
In the tab ‘guest list’ you can see the status of your invited subscribers as a list that you can export or add to static subscriber groups.

In the guest list, you also have the option to display subscriber- and form fields and filter the data in the guest list using these fields.
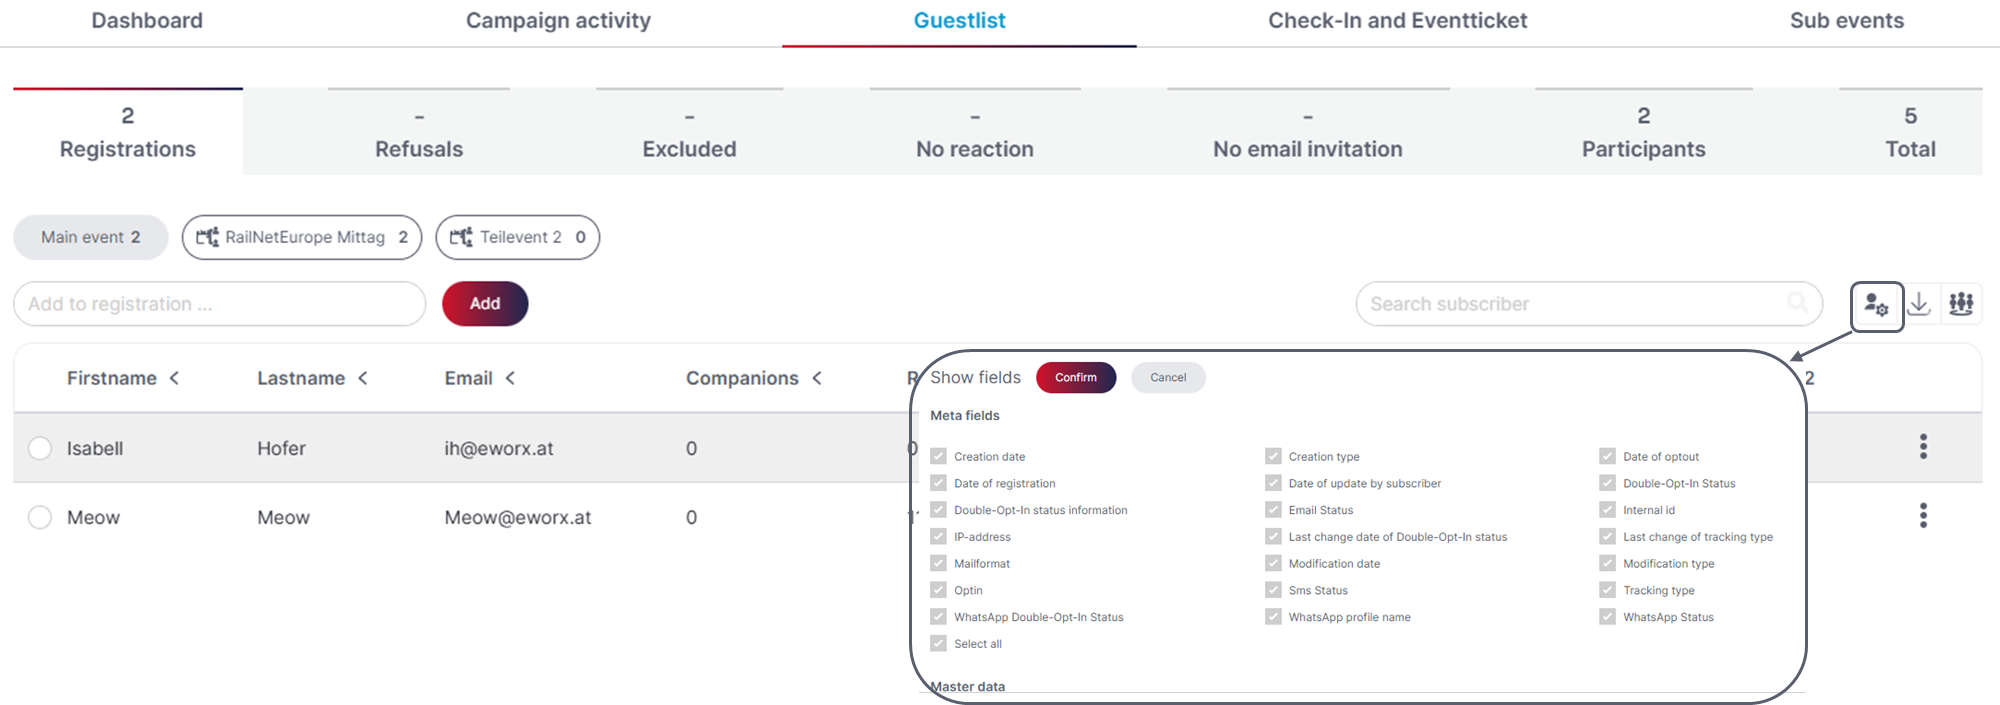
By choosing one or more subscribers more buttons appear that allow different actions. Depending on the tab you are in you can confirm the participation of a subscriber,to register a refusal, confirm or note the participation. You can find these actions also under the three dots on the right-hand side of the respective subscriber.

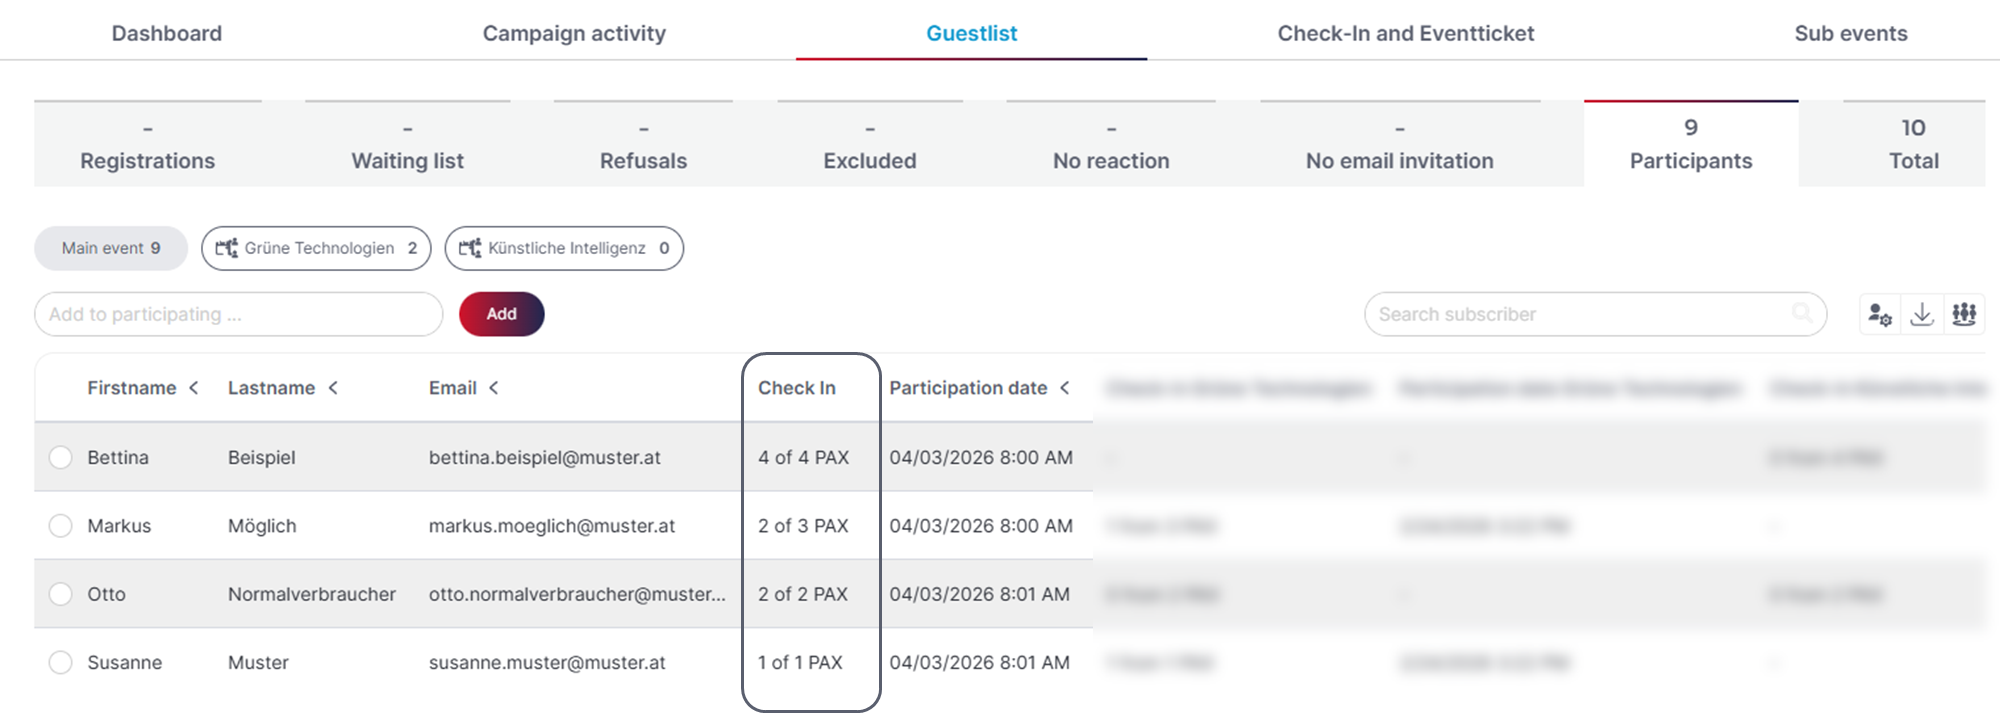
Can I see who actually attended the event after it has taken place?
In the guest list, under the “Participants” tab, you can see which recipients actually attended the event – in other words, for which subscribers attendance was registered (via the event app).
The “Check-in” column displays the checked-in attendees or accompanying persons per registration as PAX (Persons approximately). This allows you to see at a glance whether only the participant or one or more accompanying persons were confirmed, ensuring that the correct number of participants is displayed.
Here is an example of how PAX is calculated:
Subscriber + 3 accompanying persons = 4 PAX
Subscriber only (no accompanying persons) = 1 PAX
Am I able to make manually modify the guest list?
You can add subscribers to your guest list if the subscriber already exists in your client. You can also edit the registration data of subscribers that are already on your guest list. This also allows you to add companions to an attendee. Please be aware that editing the subscription data also effects the subscriber data if you used subscriber fields for registration.
Note: Changing the subscription data will automatically send the campaign that you defined as ‘Campaign when sending the form’.
How can I create name cards for the event?
Under “Check-in and Event Ticket” > “Name Cards” for the respective event, you can create and print name badges for your guests in just a few steps. Further information is summarised in the following whitepaper.
How do I send tickets with QR codes to my subscribers?
Under “Check-in and Event Ticket” > “Event Ticket” for the relevant event, you can configure the Event Ticket for your event in just a few steps. Further information is summarised in the following whitepaper.
Can I create multiple sub-events within a single event?
Sub-events are an innovative way to successfully organise and run events. If you have purchased the add-on and have the necessary permissions, it will be possible in future to split a main event into various smaller events or activities.
These can then be viewed and edited separately.
Further information on sub-events is summarised in the following whitepaper.